InfluxDB: Offline Backup and Restore of Databases

InfluxDB-Backup-Restore

InfluxDB is a great Database for Time-Series use cases and it has found its way into the IOT domain. This article will talk about how to migrate your data from one InfluxDB instance to another.

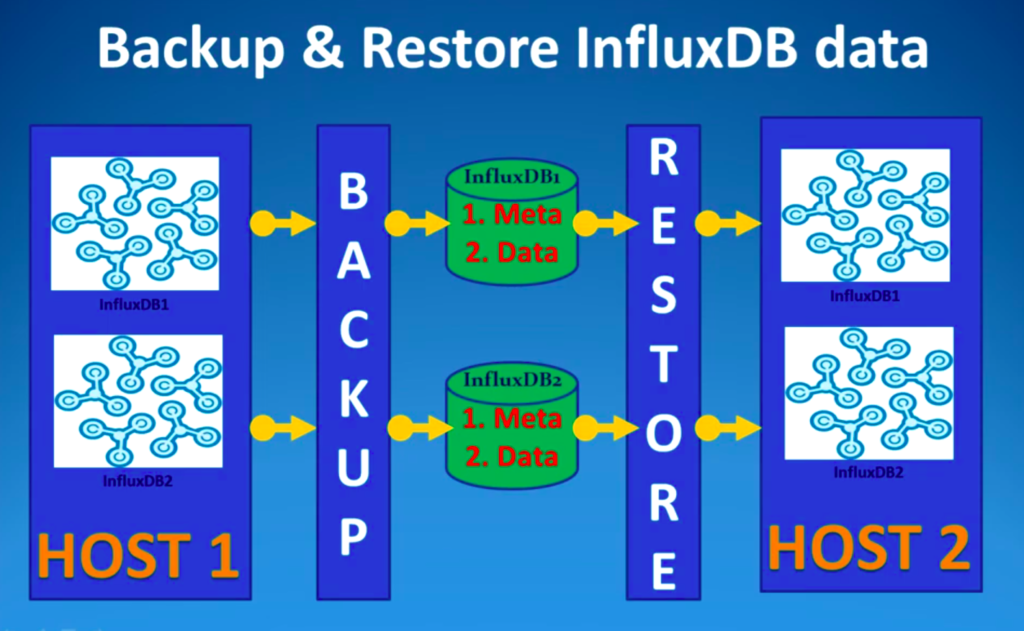
We will first Backup our database, make a Tarball and finally Restore the database to new instance of InfluxDB.

Check Out : How to Setup InfluxDB instance

InfluxDB-Backup-Restore

Steps to Backup and Restore Influx DB

There are 2 components of every influxDB instance :

  1. Metadata: It stores the info about all databases, its measurements and tags
  2. Data: It stores actual data for a Database

Step 1: Backup Database

We need to create a backup of our Database

influxd backup -database [DATABASE NAME] <PATH-TO-BACKUP>

# Backup Metadata
influxd backup .

# Backup Data (includes metadata)
influxd backup -database indooroutdoorenvdata .

Step 2: Move data from one computer to another

We need to zip the data and move it to our destination server.

# Zip the Data
tar -czvf file.tar.gz <PATH-TO-STORE>

# Unzip the data
tar -xzvf file.tar.gz

# To move the data between different server you can use sftp
sftp user@11.22.33.44

# Then use put/get to move the data

Step 3: Restore the Database

# Restore the database by giving the path to metadir and datadir (from config files)
sudo influxd restore -database indooroutdoorenvdata -metadir /var/lib/influxdb/meta -datadir /var/lib/influxdb/data .

# Need to change permission for imported files
sudo chown -R influxdb:influxdb /var/lib/influxdb

Step 4: Restart the Database

sudo systemctl stop influxdb
sudo systemctl start influxdb
sudo systemctl status influxdb

After this your Databases will be visible in InfluxDB console. If you had more than 1 DB, then all your DBs will be shown but data will be present only for the DB which you Backup-ed.

How to Setup InfluxDB instance on Cloud VM [Ubuntu/Debian]

InfluxDB-Ubuntu

InfluxDB is a Time Series Database system which is a perfect fit for Internet Of Things Applications. It supports high read/write load and also has retention policies that describes for how long and how much data is kept by InfluxDB over a period of time.

Here in this article we will learn how to setup InfluxDB instance on a Linux Virtual Machine with necessary security.

InfluxDB on Ubuntu Virtual Machine

Step 1 : First you need to add the InfluxDB repository with the following three commands.
wget -qO- https://repos.influxdata.com/influxdb.key | sudo apt-key add -

export DISTRIB_ID=$(lsb_release -si); export DISTRIB_CODENAME=$(lsb_release -sc)


echo "deb https://repos.influxdata.com/${DISTRIB_ID,,} ${DISTRIB_CODENAME} stable" | sudo tee /etc/apt/sources.list.d/influxdb.list
Step 2 : Run the command below in the terminal to install InfluxDB.
sudo apt update
sudo apt install influxdb
Step 3 : After the installation, it is still necessary that you start InfluxDB
sudo systemctl unmask influxdb
sudo systemctl start influxdb

Here are some general commands to Create Database and Enter Measurements Values

# Setup of Influx DB
influx
CREATE DATABASE database_name
SHOW DATABASES
USE database_name

> INSERT temperature,location=indoor value=23
> INSERT temperature,location=outdoor value=19
> INSERT temperature,location=indoor value=22
> INSERT temperature,location=outdoor value=18

SELECT * FROM temperature
SELECT value FROM temperature WHERE location='indoor''

SHOW measurements
SHOW field keys
SHOW tag keys
SHOW users

DROP DATABASE database_name

Securing your InfluxDB and Modify Config File

It’s important to secure your InfluxDB Database to protect from unauthorized access. Use the Below commands to implement Username/Password Authentication.

CREATE USER samarth WITH PASSWORD '*******' WITH ALL PRIVILEGES

# Modify config file to implement authentication 
sudo nano /etc/influxdb/influxdb.conf

[HTTP]
auth-enabled = true
pprof-enabled = true
pprof-auth-enabled = true
ping-auth-enabled = true
flux-enabled = true

# Restart to implement changes
sudo systemctl restart influxdb

# Login with below command 
influx -username samarth -password *******

You will be able to login without the username and password but you won’t be able to Use any database.

Important: If you want to access InfluxDB from the cloud you need to open port 8086 in your VM settings. No need to open the port if your cloud application is using the database.