The Network Time Protocol is a Networking Protocol which is used to synchronize time for nodes in a Network. NTP is one of the oldest protocol in the TCP/IP stack which is still in use. NTP is intended to synchronize all participating computers to within a few milliseconds of Coordinated Universal Time (UTC).
 The protocol is usually described in terms of a client-server model, but can as easily be used in peer-to-peer relationships where both peers consider the other to be a potential time source.
How NTP works
NTP works on IP port – 123 and to run NTP we first install NTP daemon (ntpd) on both Time Provider(server) and Time Consumer(client)
The NTP client initiates a time-request exchange with the NTP server. As a result of this exchange, the client is able to calculate the link delay and its local offset, and adjust its local clock to match the clock at the server’s computer. As a rule, six exchanges over a period of about five to 10 minutes are required to initially set the clock.
Once synchronized, the client updates the clock about once every 10 minutes, which prevents the time drift from happening. In Other words ,large adjustment are made quickly and small adjustment are made over a period of time.
NTP Stratum
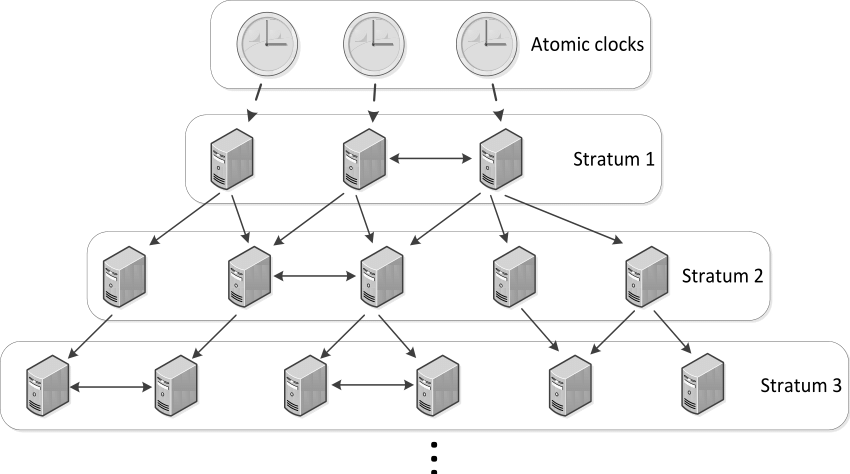
NTP uses the concept of stratum to define the hierarchy of NTP servers. At top of the hierarchy are Stratum 1 which gets their time from Atomic clocks which tells exact time at the moment.
Similarly Stratum 2 time providers get their time from Stratum 1 time provider and Stratum 3 from Stratum 2. And these stratum can go upto 256 layers.
There are many Stratum 2 servers available on the public internet which we can use for couple of PC. But if you have large number of PC’s in the network it is wise to create a local stratum (maybe 2-3) which get its time from Stratum 2 time provider and PC’s in your local network can get time from its local Stratum.
Some important terms related to NTP
Stepping: When time difference between consumer and provider is large then time adjust are made more quickly ~1min.
Slewing: When time difference is very less ~128ms the ntp will adjust time gradually around every 17 minutes
Insane Time: If time difference between consumer and provider is more than 17 min, then ntpd treats that time to be insane.
Drift: Your clock will drift due to fluctuations in the frequency oscillating the quartz crystal on your motherboard. A fluctuation of just 0.001% (0.00001, or 10 PPM) means losing or gaining about 1 second per day.
Latency: The time delay between when data is sent on a network to when it is received. Latency can make it difficult to synchronize processes over a network, especially when the latency is variable. The latency is added to the time it got from server to get the exact time.
Jitter: It is a measurement of the variance in latency on the network. If the latency on the network is constant, there is no jitter.
Configuring NTP
Here we will see how to configure a system to use NTP
#installing NTP on linux machine
yum install ntp
apt-get install ntp
Now we will edit the server for NTP. Open the file /etc/ntp.conf
And edit the server info as [server server_address]
you can get list of server from https://www.pool.ntp.org/en/. From the website choose the server closest to your geographical location.
Remembered, previously we talked about Insane Time (where system and server time difference is more than 17min), to prevent such situation we run below command to update the system time (close to actual time) to eliminate insane time issue
ntpdate server_address

#you can use google public ntp server
#sometimes you need to run it more than once
ntpdate time.google.com
Note : Before running the above command make sure to turn of ntpd by [ntpd off] and start after executing above command [ntpd on].
Monitor time synchronization : ntpq -p , ntptrace
Log File of NTP : /var/log/ntp.log
How is SNTP different from NTP ?
Simple Network Time Protocol (SNTP) is a simplified, client-only version of NTP. SNTP can receive only
the time from NTP servers; it cannot be used to provide time services to other systems.
SNTP typically provides time within 100 milliseconds of the accurate time, but it does not provide the complex
filtering and statistical mechanisms of NTP. In addition, SNTP does not authenticate traffic, although you
can configure extended access lists to provide some protection. An SNTP client is more vulnerable to servers
that have unexpected behavior than an NTP client, and should be used only in situations where strong
authentication is not required.
So that all to get the basics of NTP protocol if you are more interested to dig in, do visit Cisco NTP


 with WPA Supplicant")

 without Port Forwarding")