Test Speed of your Internet from Terminal/CLI in Linux

speedtest-terminal

There are various web applications to test the speed of your Internet Connection. The most famous being Speedtest by Ookla – Link Here

But suppose you want to test your network bandwidth from a Linux machine without a desktop environment installed or for just looking cool among your friends.

speedtest-terminal

Follow below steps to install Speedtest app from Terminal

Execute below commands in you terminal window. These commands will add ookla (speedtest) repo mirror to your apt-get package manager list.

    • sudo apt-get install gnupg1 apt-transport-https dirmngr
    • export INSTALL_KEY=379CE192D401AB61
    • sudo apt-key adv --keyserver keyserver.ubuntu.com --recv-keys $INSTALL_KEY
    • echo "deb https://ookla.bintray.com/debian generic main" | sudo tee /etc/apt/sources.list.d/speedtest.list
    • sudo apt-get update
    • sudo apt-get install speedtest

After the installation just run “speedtest” command, it will automatically choose the best server for testing and display the results.

How to Install and Configure SSH Server on a Ubuntu Desktop

ssh-protocol

We usually use SSH to access Cloud Servers or IoT gateways – like Raspberry Pi, but sometimes a situation arises where we need to SSH into our desktop for some or other reasons. Or maybe you want to install SSH Server to a Ubuntu OS for a completely different purpose. That’s fine because here we will discuss how to install and configure SSH Server for your Ubuntu Machine.

You can use this method for any version of Ubuntu, Xubuntu, Lubuntu or any other OS based on Debian. Know more about terms like – LINUX, UNIX, Debian, Ubuntu, Kernel, GNOME, GNU, APT, RPM, YUM, GNOME

ssh-protocol

3 Steps to Install and Configure SSH on Ubuntu via Terminal

  1. Install SSH-Server : sudo apt install openssh-server
  2. After installation the SSH service will start automatically, you can verify it by running sudo systemctl status ssh it will show “active running”. Press “q” to quit
  3. Now you need to enable ssh from firewall by using this command : sudo ufw allow ssh

That’s all now you can connect to your ubuntu machine by using ssh username@host-ip

Make SSH connection on Public Internet (WAN) without Port Forwarding

remote-ssh-raspberry-pi

Making an SSH connection is something elementary while developing an IOT project, just open the port 22 install an SSH server and you are ready to go. But sometimes you need to access a device which is behind a router on Public internet. One scenario is you want to access a device that is present in a different city or a country.

remote-ssh-raspberry-pi

For this situation, we will use a VPN managed service from remote.it (this service creates a VPN between itself and your device, and let you access that device from its dynamic address)

STEP 1: Create a free developer account and install the remote.it service on your device by clicking add device option.

For raspberry pi just execute the below line

sudo apt update && sudo apt install -y connectd && sudo connectd_installer

STEP 2: Sign-in to the service using your credentials for remote.it on your terminal.

STEP 3: Select the Application (Port you want to open). Also, you can map any device in your LAN(ex. router homepage) to any application.

STEP 4: On the Web Console, click on DEVICE -> Device Name -> Service. Then from the window copy, the remote address and you are good to go.

Additional Official Documentation: HERE

Docker : Installation, Pull and Run a Container from Docker HUB

docker-install

Installation of Docker is pretty straightforward. In this article we will be focusing on Linux installation for docker. Do check below links for docker installation in other OS

-Install Docker on Ubuntu

-Install Docker on Windows

-Install Docker on MacOS

-Install Docker on Raspbian (Raspberry PI)

Alternatively, for Linux/Raspberry Pi just run this command and you are good to go

curl -sSL https://get.docker.com | sh

docker-install

Follow the below instructions to install docker on linux machine [OPTIONAL]

1. Add GPG keys for official docker repo

curl -fsSL https://download.docker.com/linux/ubuntu/gpg | sudo apt-key add -

2. Add docker repo to apt sources

sudo add-apt-repository "deb [arch=amd64] https://download.docker.com/linux/ubuntu $(lsb_release -cs) stable"

3. Update package database

sudo apt-get update

4. Install Docker

sudo apt-get install -y docker-ce

Moreover you can check the full installation HERE


Basic Commands to check Docker Installation

Check weather docker is installed and running (to quit CTRL+C)

sudo systemctl status docker

List Docker (list of docker commands, also management command-since docker 2017)

sudo docker

Docker Version (returns the version of client and server (engine/daemon/service)

sudo docker version

Docker Info (returns details about our configuration and setup for our engine)

sudo docker info

Docker Daemon Start/Stop

Docker has 2 components :
1. Docker Daemon (Engine) : This is the core of Docker which runs in the background
2. Docker CLI (Client) : Docker component with which user interacts

docker-cli-daemon

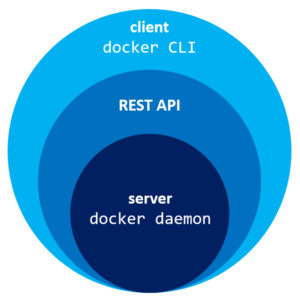
Both these components communicate with each other using REST API’s on Port number – 2376

START Docker Daemon

sudo service docker start

STOP Docker Daemon

sudo service docker stop

Running a Container

Before running a Container we need to have a Docker Image (as container is a runtime instance of docker image), we can not run a container without having a Docker Image , cause that will not make any sense.

So here are some Commands for for Docker Images

View Docker Images present on our computer

sudo docker images
sudo docker images ls

View details of Docker Image present

sudo docker inspect ImageID

Delete Docker image from System

sudo docker rmi ImageID

So now that we know about docker images lets see how to run them, and no worries if you don’t have any image in you system (we have that covered)


Docker RUN command

Here is the most important docker command which is used to Run Images and if that image is not present locally on you system then docker run will download it from dockerhub and run it

sudo docker run -it Image

We can attach additional parameter as -d (for detach mode) , -p (to map port of docker and host)

To give it a try, run ubuntu image (if its not present locally, which i guess not, then it will download and run that command)

sudo docker run centos –it /bin/bash

This command will download the centOS image from docker hub and start an interactive session at /bin/bash

Alternatively, if you want only to pull image and not run it, you can use the below command. Also this command can also be used when your local system has a outdated image and you want to update you local copy with updated copy.

sudo docker pull centos

Thats all for this session, in next tutorial we will explore more into containers.

How to Install NOOBS on Raspberry Pi

raspberry pi usb ports image

To start with Raspberry Pi you need an OS (operating system) to run on it like all personal computers. On this OS you will run all you programs and applications.

Like on your laptop you can install various OS – like Windows, Ubuntu etc. Similarly on your Raspberry Pi you can install various operating system.

raspberry pi logo

Check the list of Operating System Available for Raspberry PI

NOOBS stands for New Out Of the Box Operating system. NOOBS is an easy operating system installer which contains Raspbian. It also provides a selection of alternative operating systems which are then downloaded from the internet and installed.

Steps to Install NOOBS on SD Card

Buy an SD card 

Card capacity should be 8GB or more, preferably class-10 or more

Download Noobs

Click HERE and download the version of noobs (if you are unsure choose the option with Offline and Network install and Download Zip)

Prepare The Sd Card

Format your sd card with the tool given HERE (choose either for windows or Mac)

Insert your SD card into the computer or laptop’s SD card reader and make a note of the drive letter allocated to it, e.g. G:/

You will need to set “FORMAT SIZE ADJUSTMENT” option to “ON” in the “Options” menu to ensure that the entire SD card volume is formatted, and not just a single partition. After that click Format

DRAG AND DROP NOOBS FILES

Once your SD card has been formatted, drag all the files in the extracted NOOBS folder and drop them onto the SD card drive.
The necessary files will then be transferred to your SD card.
When this process has finished, safely remove the SD card and insert it into your Raspberry Pi.

FIRST BOOT

Plug in your keyboard, mouse, and monitor cables.
Now plug the USB power cable into your Pi.
Your Raspberry Pi will boot, and a window will appear with a list of different operating systems(you will only get raspbian based on your download) that you can install. We recommend that you use Raspbian – tick the box next to Raspbian and click on Install.
Raspbian will then run through its installation process. Note that this can take a while.

Congratulations, Now you have successfully installed. After this the Rasoberry Pi will restart and load into its graphical interface.