Configure Visual Studio code for Arduino Development

Configure Visual Studio code for Arduino Development

These days IoT is becoming such a buzz word that many software professionals want to dive into the Embedded world. And the primitive board to start with embedded programming is ARDUINO. But the IDE which Arduino foundation provides us is basic and lacks essentials features for serious programming like Intellisense, GIT integration, code lay-outing, and necessary shortcuts.

One of the best IDE providers in the marketplace “VS Code” released an Arduino plugin to make life easier for serious programmers who want to work on Arduino. So here in this article, we will see how to install and configure VS Code for Arduino development.

Just follow the below steps and you will be up and running with a ‘Hello World’ example or Blink as they call it in Arduino world.

1. Install VS Code

Head on to https://code.visualstudio.com/download

2. Install Arduino IDE

Don’t get confused, official Arduino IDE contains some important libraries which will be used by VS Code.

Download Arduino IDE: https://www.arduino.cc/en/main/software

3. Install Arduino Extension for VS Code

Install Arduino extension for VS Code: https://marketplace.visualstudio.com/items?itemName=vsciot-vscode.vscode-arduino

This extension will also install C/C++ package as an add-on which is important for this setup.

After installing these IDE and Packages close them. Connect the Arduino board and re-launch VS Code.

4. Open Blink Example for Arduino

Not all VS Code’s functionality is accessible via menus. Instead, VS Code has a command-line-type facility for interfacing with extensions called the Command Palette.

To run the Command Palette, type “Cntrl+Shift+p” to display a drop-down box that you can enter commands in. Type “Arduino Examples” into the command palette and press return. This will open up a link to the familiar example projects – navigate to “01.Basics” and then double click on “Blink” to open the world-famous Blink project.

Once you have opened up an Arduino .ino file, VS Code reconfigures in an Arduino mode, and gives access to special functionality in its bottom blue margin, as shown in the image below.

VS-code-arduino-config

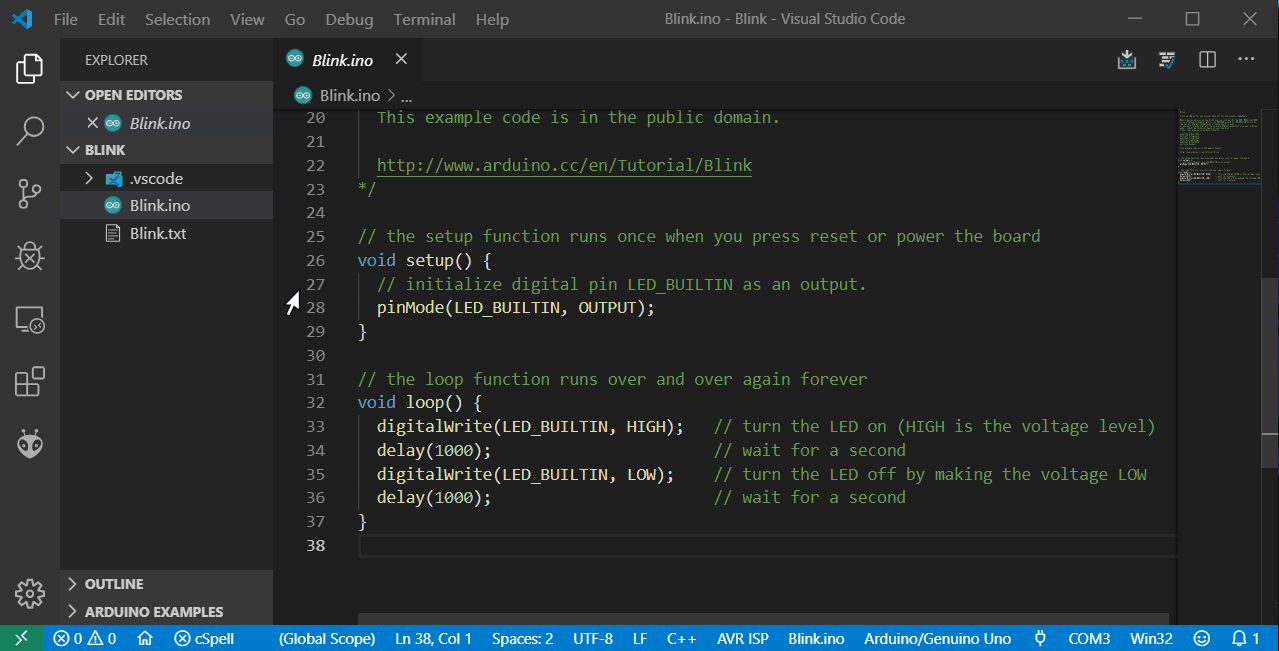
Click on <Select Programmer> and select AVR ISP (Arduino AVR Board)

Click on <Select Board Type> and select Arduino/Genuino Uno

Click on <COM> and select your Arduino serial port

At the top right of the window, you will see icons for Verify and Upload the code. All other features from Arduino IDE can be searched on Command Pallet

5. Taking Advantage of VS Code functionalities

  • Intellisense and Error Checking: IntelliSense is a code completion engine that looks through all of the source code in your project — including external libraries — and then suggests functions and variables as you type your code. Also, VS Code constantly checks your code as you write. If it detects an error, it underlines it with a red squiggle and offers advice.
  • Use a src folder to hold your code folders: Layout your project properly using a folder structure as below:-

ArduinoRootFolder
— src
——- FolderA
——- FolderB
————-SubfolderA

  • Add an ‘output’ option to arduino.json: By default, you will have an arduino.json file in your project under .vscode folder which contains build information for your project. Just add the below line to build your project in the current folder itself

,”output”: “build”

  • Gitify Your project: One powerful thing which you can do VS Code is using GIT and checking in your code without any delay. Just click the Git icon at the extreme left of the window.

That’s all you need to set up your Arduino project in a professional way. Below are some links which you can refer to if you want a more elaborative explanation.

  1. Basic Guide
  2. Advance Guide
  3. Full Comprehensive Guide

An Introduction to Functions in Arduino | How to Make Funciton

Arduino hd image

An Arduino function is a block of code that has a name and a block of statements that are executed when the function is called. The functions void setup() and void loop() have already been discussed here.

Arduino hd image

Custom functions can be written to perform repetitive tasks and reduce clutter in a program. Functions are declared by first declaring the function type. This is the type of value to be returned by the function such as ‘int’ for an integer type function. If no value is to be returned the function type would be void. After type, declare the name given to the function and in parenthesis any parameters being passed to the function.

type functionName(parameters)
{
statements;
}

The following integer type function delayValue() is used to set a delay value in a program by reading the value of a potentiometer. It first declares a local variable v, sets v to the value of the potentiometer which gives a number between 0-1023, then divides that value by 4 for a final value between 0-255, and finally returns that value back to the main program.

int delayVal()
{
int v;                               // create temporary variable ‘v’
v  = analogRead(pot);    // read potentiometer value
v /= 4;                            // converts 0-1023 to 0-255
return v;                        // return final value
}

Curly braces
It define the beginning and end of function blocks and statement blocks such as the void loop() function and the for and if statements. type function() {   statements; }

An opening curly brace { must always be followed by a closing curly brace }. This is often referred to as the braces being balanced. Unbalanced braces can often lead to cryptic, impenetrable compiler errors that can sometimes be hard to track down in a large program.

Semicolon
A semicolon must be used to end a statement and separate elements of the program. A semicolon is also used to separate elements in a for loop.

int x = 13;   // declares variable ‘x’ as the integer 13


Block comments, or multi-line comments
These are areas of text ignored by the program and are used for large text descriptions of code or comments that help others understand parts of the program. They begin with /* and end with */ and can span multiple lines.

Single line comments 
They begin with // and end with the next line of code. Like block comments, they are ignored by the program and take no memory space.
Single line comments are often used after a valid statement to provide more information about what the statement accomplishes or to provide a future reminder.

Learn Simple Hello World Program

These are all the basic tools you need to create a function in Arduino.

The setup() and loop() Functions in Arduino Programming

arduino infinity official logo

As we have seen in Basic Structure for Arduino that there are 2 basic functions in an Arduino Program.

arduino infinity official logo

setup()

The setup() function is called once when your program starts. Use it to initialize pin modes, or begin serial. It must be included in a program even if there are no statements to run.

void setup()
{
pinMode(pin, OUTPUT);      // sets the ‘pin’ as output
}

 loop()

After calling the setup() function, the loop() function does precisely what its name suggests, and loops consecutively, allowing the program to change, respond, and control the Arduino board.

void loop()
{
digitalWrite(pin, HIGH);   // turns ‘pin’ on
delay(1000);               // pauses for one second
digitalWrite(pin, LOW);    // turns ‘pin’ off
delay(1000);               // pauses for one second
}

By using these 2 functions you can create any Arduino Program.

Basic Structure of Arduino Programming | Setup & Loop Function

Basic Structure of Arduino Programming | Setup & Loop Function

The basic structure of the Arduino programming language is predefined and fairly simple. It runs in at least two parts. These two required parts, or functions, enclose blocks of statements.

Arduino official Logo

This is Basic Structure of Every Arduino Program

void setup()
{
statements;
}void loop()
{
statements;
}

Where setup() is the preparation, loop() is the execution. Both functions are required for the program to work.

The setup function should follow the declaration of any variables at the very beginning of the program. It is the first function to run in the program, is run only once, and is used to set pinMode or initialize serial communication.

The loop function follows next and includes the code to be executed continuously – reading inputs, triggering outputs, etc. This function is the core of all Arduino programs and does the bulk of the work.

So this is the primitive or basic structure of an Arduino Program.