Node-RED is a great visual programming tool particularly for Internet of Things projects as it allows us to connect Edge Devices to the Cloud Servers/Gateways using various protocols like MQTT, HTPP, COAP. We can also interface it with various Databases like MySQL, InfluxDB, MongoDB, etc.
Moreover, it also provides a Dashboard for Data Visualisation, so it provides a complete platform to prototype your project and in many cases use it in the production environment.
Node-RED can be installed on any Linux machine be it Raspberry Pi, your local PC or a Cloud Virtual Machine. Here in this article we will learn how to quickly deploy a Node-RED instance on Cloud Virtual Machine. This method can be followed for any Cloud vendor
The VM should hava a minimum configuration of
- 1 vCPU
- 1 GB RAM
- 10 GB Hard Disk
- Port 1880 Opened to public internet
Steps to Install Node-RED instance on Cloud VM
First, SSH onto the VM (basically we want access to the shell of the Virtual Machine). Then execute the below commands to set up repos and install the components:
curl -sL https://deb.nodesource.com/setup_12.x | sudo -E bash -
sudo apt-get install -y nodejs build-essential
sudo npm install -g --unsafe-perm node-red
These commands will install Node.JS (version 12.x), install build-essentials (which contains a list of packages which are considered essential for building packages) and finally install node-red.
In addition to Node.JS, the relative Packet Manager “npm”, essential for the installation of each of its modules, will be installed. To verify that your installation was successful using the above commands, check the version of the software installed by typing:
node -v
npm -v
node-red -v
Now we want our Node-RED app to start on reboot and restart whenever some issue occurs, for that we will be using PM2 which is a production process manager for Node.js applications, It allows you to keep applications alive forever, to reload them without downtime, and to facilitate common system admin tasks.
sudo npm install -g --unsafe-perm pm2
pm2 start `which node-red` -- -v
pm2 save
pm2 startup

pm2 stop node-red
Steps to Secure your Node-RED with Password Authentication
By default, Node-RED doesn’t have any authentication, which means anyone with the IP address of your VM can access your server (and that’s not a good thing). So we need to have a basic username-password authentication for your node-red instance.
First of all generate a hash of your password and save it somewhere (to be used later)
node-red admin hash-pwNow open the below file to be edited
sudo nano .node-red/settings.jsAnd uncomment the below lines and change the username and password (which we copied earlier)
    // Securing Node-RED
    // -----------------
    // To password protect the Node-RED editor and admin API, the following
    // property can be used. See http://nodered.org/docs/security.html for details.
    adminAuth: {
        type: "credentials",
        users: [{
            username: "samarth",
            password: "$2a$08$zZWtXTja0fB1pzD4sHCMyOCMYz2Z6dNbM6tl8sJogENOMcxWV9DN.",
            permissions: "*"
        }]
    },
If you are also using Node-RED Dashboard and want to implement username-password authentication there as well, uncomment the below lines and edit it.
    // To password protect the node-defined HTTP endpoints (httpNodeRoot), or
    // the static content (httpStatic), the following properties can be used.
    // The pass field is a bcrypt hash of the password.
    // See http://nodered.org/docs/security.html#generating-the-password-hash
    httpNodeAuth: {user:"samarth",pass:"$2a$08$zZWtXTja0fB1pzD4sHCMyOCMYz2Z6dNbM6tl8sJogENOMcxWV9DN."},
    //httpStaticAuth: {user:"user",pass:"$2a$08$zZWtXTja0fB1pzD4sHCMyOCMYz2Z6dNbM6tl8sJogENOMcxWV9DN."},
Now just restart the Node-RED and you will be prompted to enter a password to access your Application as shown in image below.
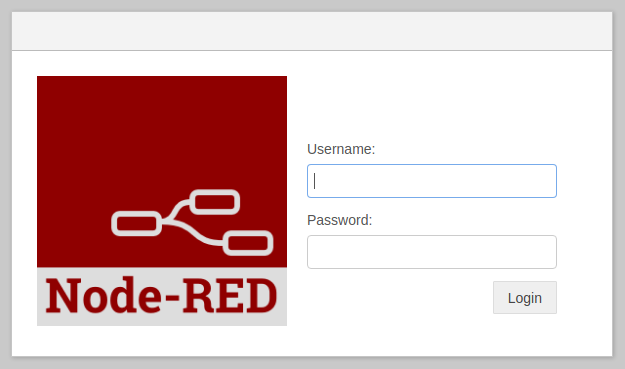
That’s all now anyone who wants to access your Node-RED application on the public internet needs to the Username and Password for logging-in.