Configure Wifi on Raspberry Pi running Raspbian in Headless Mode via Terminal

rpi-wifi-config-raspbian

Well if you came to this article 1 thing is sure that you are running your Raspberry Pi in Headless Mode (with GUI) and you want to configure WiFi on your Pi. If by any chance you are using Ubuntu head on HERE. And if you are using Raspbian / Raspberry Pi OS (as they call it nowadays) you can read this article.

There are actually 2 ways to configure WiFi – “The Easy Way” and “The Technical Way”. If you are in hurry, then just follow the easy way at the end of this article and if you want to understand the internal working of an OS then you proceed with the Technical way.

configure-wifi-raspberry-pi-headless-terminal

The Techincal Way to Configure WiFi on Raspberry Pi OS

1. Editing wpa_supplicant.conf file:
sudo nano /etc/wpa_supplicant/wpa_supplicant.conf

2. Add WiFi access information to wpa_supplicant.conf file:
ctrl_interface=DIR=/var/run/wpa_supplicant GROUP=netdev
update_config=1
country=IN

# add wifi setup information here ...
network={
        ssid="SamTeck"
        psk="iot.samteck.net"
        key_mgmt=WPA-PSK
}

3. Restart Wifi Adaptor
sudo ifdown wlan0
sudo ifup wlan0

Confirmation Test:

sudo reboot
 
### wait, then without the wired ethernet connected ... 
ssh pi@wifi-ip-address

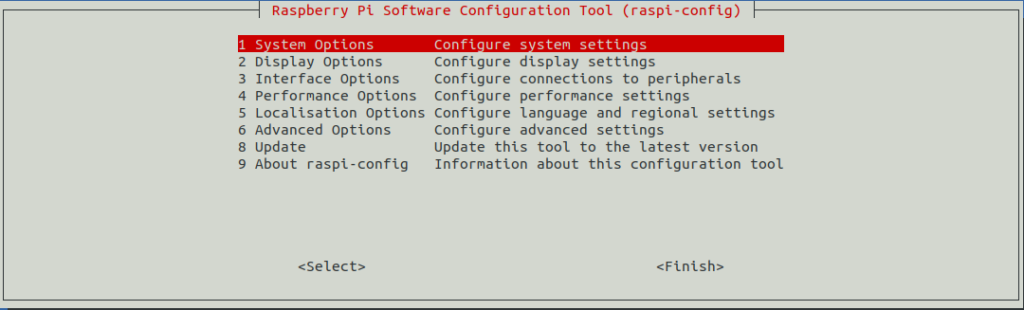
The Easy Way to Configure WiFi on Raspberry Pi OS

Well this one is pretty easy will require just 2 mins to connect to WiFi; yes I know 2 min is still lot compared to the GUI way of just selecting the SSID and entering the password; but doing it the command line way is lot more FUN!

Enter this command in your terminal and follow the steps.

sudo raspi-config

Now refer the screenshots below to enter your SSID and Password

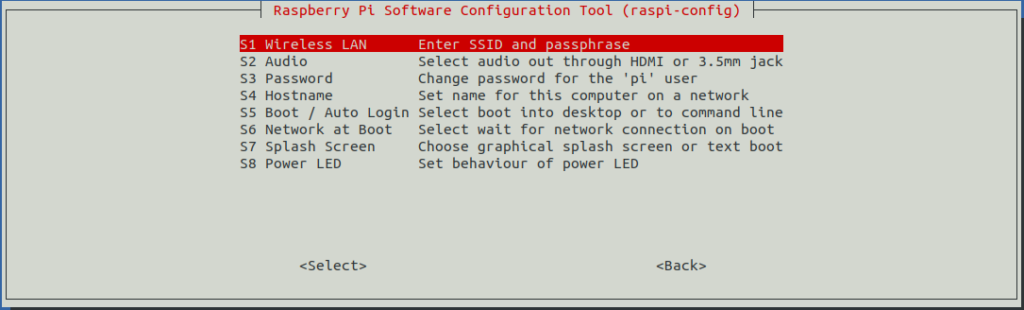
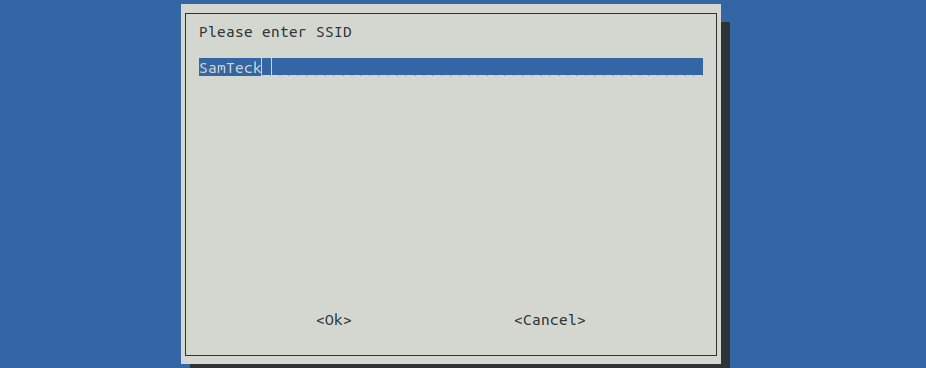
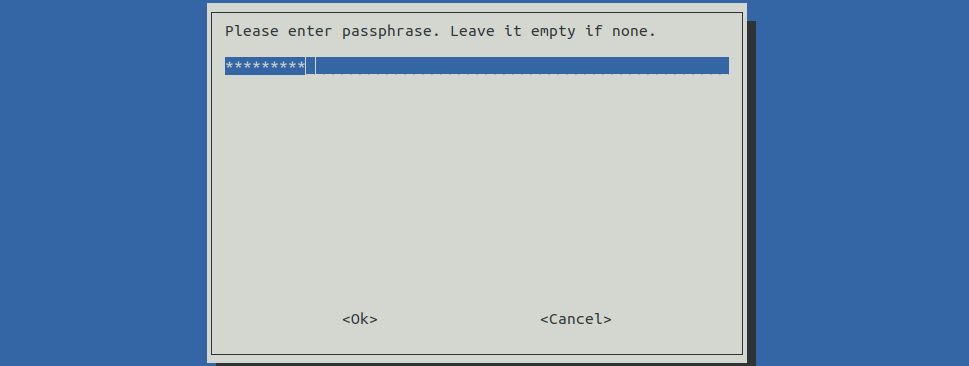
Click OK and it will ask you to restart the Pi. After restart your Pi will be connected to the Wifi.

Configure WiFi on Raspberry Pi running Ubuntu in Headless Mode via Terminal

Configure WiFi on Raspberry Pi running Ubuntu in Headless Mode via Terminal

So, you flashed Ubuntu onto your SD card and booted Raspberry Pi for the first time, But realized that it’s not connected to the internet. Or maybe you just want to move from a wired Ethernet connection to WiFi. Well in this article we will discuss how to connect to WiFi using Ubuntu’s Netplan utility which is easy comparative to the wpa_supplicant utility which we used earlier..

Configure Wifi on Ubuntu Terminal Raspberry Pi

Follow the steps below to Configure Wifi on Ubuntu

1. Update system (Optional):
sudo apt update
sudo apt full-upgrade
sudo reboot

2. Determine interface names (copy wireless interface)
ip link show

# 1: lo: <LOOPBACK,UP,LOWER_UP> …
# 2: eth0: <BROADCAST,MULTICAST,UP,LOWER_UP> … state UP …
# 3: wlan0: <BROADCAST,MULTICAST> … state DOWN 

3. Determine your-cloud-init.yaml and open for editing (prefix 50 most of the times)
cd /etc/netplan/
ls -l
# -rw-r--r-- 1 root root 666 May 15 22:00 50-cloud-init.yaml
### note your *-cloud-init.yaml file name

### backup *-cloud-init.yaml file
cp 50-cloud-init.yaml 50-cloud-init.yaml.bak

### edit *-cloud-init.yaml
sudo nano 50-cloud-init.yaml

4. Add WiFi access information to *-cloud-init.yaml file
# This file is generated from information provided by
# the datasource.  Changes to it will not persist across an instance.
# To disable cloud-init's network configuration capabilities, write a file
# /etc/cloud/cloud.cfg.d/99-disable-network-config.cfg with the following:
# network: {config: disabled}
network:
    version: 2
    ethernets:
        eth0:
            optional: true
            dhcp4: true
    # add wifi setup information here ...
    wifis:
        wlan0:
            optional: true
            access-points:
                "SamTeck":
                    password: "iot.samteck.net"
            dhcp4: true

Test, generate and apply the changed your-cloud-init.yaml config:

  • Testing: sudo netplan --debug try (continue even if there are errors)
  • Generate: sudo netplan --debug generate (provides more details in case of issues with the previous command)
  • Apply: sudo netplan --debug apply (if no issues during the previous commands)

Confirmation Test:

sudo reboot

### wait, then without the wired ethernet connected ... 
ssh ubuntu@wifi-ip-address

This is way easier compared to the old wpa_supplicant method in which we need to install it separately and much more steps for configuration.

Configure Wifi in Debain Linux(Ubunut Server) with WPA Supplicant

wifi-wpa-supplicant

Configuring wifi is a pretty easy task when we have a Desktop Environment installed on our Linux system. But it becomes a troublesome process when we have to configure Wifi in headless mode. Here are some tools and commands to configure your wifi efficiently in any Debian Linux OS.

wifi-wpa-supplicant

We need to have a LAN connectivity via ethernet on the host computer where we need to configure Wifi.

  1. STEP 1: find the name of your Wireless Interface
    • iwconfig
    • sudo ifconfig wlan0 up   (bring wifi up)
    • sudo iwlist wlan0 scan | grep ESSID
  2. STEP 2: Connect to Wi-Fi Network With WPA_Supplicant
    • sudo apt install wpasupplicant
    • wpa_passphrase your-ESSID your-wifi-passphrase | sudo tee /etc/wpa_supplicant.conf
    • sudo wpa_supplicant -B -c /etc/wpa_supplicant.conf -i wlan0
    • sudo dhclient wlan0   (obtain IP address)
    • sudo dhclient wlan0 -r   (release IP address)

For more info like starting this service at boot time and obtain a status IP address head on to this Awesome Article