GIT is basically a distributed repository (place to store code) where multiple contributors can work simultaneously and collaborate their work. It also serves as a Version Controls System (system that records changes to a file or set of files over time so that you can recall specific versions later).

GIT allows you to revert files back to a previous state, revert the entire project back to a previous state, review changes made over time, see who last modified something that might be causing a problem, who introduced an issue and when, and more. It can also help in the situations where someone screwed up the code and it’s not working anymore. You can use the Version Control System to revert back to a safe version where everything was working perfectly normal.
GIT WORKFLOW
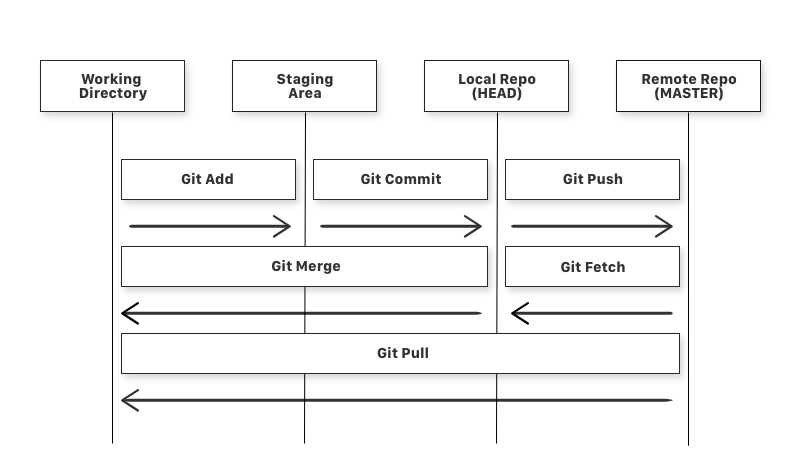
It is very important to understand GIT workflow. Let us learn a few key terms
Repository: This is your project (collection of source code). This is a GIT specific term and is a standalone unit for your project.
Working Directory: This is the working directory of your code. Here you edit your code and save changes.
Staging Area: When you are confident about your code and want to save it to the repository, You first bring it to the Staging area. You can bring your files in a sequential manner to the staging area.
Local Repository: When you have all the files you wanted to modify in the staging area and finally want to make changes to your repo, you save it to your local repo.
Remote Repository: Remote repo is a repository on a remote server which acts as a central repo for your project. Once you are 200% confident about your code. You move it to the remote repo.
Below diagram clearly explains how your code moves in the GIT environment.
Commands in Detail :
git add: add a file from working directory to staging areagit commit: add files from staging area to local repogit push: add files from the local repo to the remote repogit fetch: get files from the remote repo to the local repo (not working directory)git merge: get files from the local repo to the working directorygit pull: get files from remote repo directly to the working directory (same as git fetch and git merge)git status: gives info about all the files which are yet to be committed (to local repo)
These are the basic commands to use while working with GIT. How we will see how to use Git to work with our code.
STEP BY STEP guide to initializing and working with GIT
Check weather GIT is installed
$ git --verison
Tell GIT about your identity
$ git config --global user.name "YOUR_USERNAME"
$ git config --global user.email "me@samteck.net"

$ git config --global --list # To check the info you just provided
Generate SSH and add to your GitHub account (more on ssh keys)
$ ssh-keygen -t rsa -b 4096 -C "me@samteck.net"

$ ssh -T git@github.com   # check your ssh connection
– Copy the public ssh key (id_rsa.pub) from /.ssh folder in your home directory to SSH settings in your GitHub account
Lets GITify our first directory
Navigate to your working directory (in terminal) and initialize the directory with
$ git init
this will create a hidden folder in the working directory where info about the repo will stored. Also, there is a file called – .gitignore (it stores the info about the files in the working directory which need to ignored in repo like OS related files)
Add files to the staging area (Index: view of your working directory that is ready for commit)
$ git add .   # add all the files in that folder

$ git add *file name*   # add specific files to staging area
Before committing the changes we can check the status of the working directory (staged and unstaged changes)
$ git status
When all the changes are staged we can commit our code which will be then stored in the local repo. It is a good practice to add a message with every commit so that other users can see what modification has been made. Also, it’s better to sync your workspace with remote repo before committing to check that no other commits were made on remote repo by any other user.
$ git commit -m "First commit"
NOTE: every commit can be identified with a commit hash (SHA-1). On Github, you can view that commit from below URL
https://github.com/<owner>/<project>/commit/<hash>
Also, you can uncommit a change by
$ git reset HEAD~1
Add Remote Origin
Now we have created a local repo, but to add it to a remote repo we need to provide the address of remote repo
$ git remote add origin remote_repository_URL   # sets the new remote

$ git remote -v   # List the remote connections you have to other repositories.

$ git push -u origin master   # pushes changes to origin
Now you have successfully created a local repo and pushed it to the remote repo. If you open your GitHub account, you can see that your repo is available remotely on GitHub.
Useful GIT Commands
$ git diff   # To show the files changes not yet staged

$ git log    # view commit history

$ git clone remote_repository_URL   #download remote repo to working directory

$ git pull origin master         # update your local repo with changes on remote repo

$ git checkout <branch/commit>   # check out desired status of repo
When you git fetch, Git gathers any commits from the target branch that do not exist in your current branch and stores them in your local repository. However, it does not merge them with your current branch. This is particularly useful if you need to keep your repository up to date, but are working on something that might break if you update your files. To integrate the commits into your master branch, you use git merge.
Basically, this will be your control flow which you will be using most of the times.
$ git add .

$ git status # Lists all new or modified files to be committed

$ git commit -m "Second commit"

$ git push -u origin master
That’s all for the basic understanding of GIT. Thanks for reading.