How to Setup ThingsBoard IOT Platform on Cloud VM [Ubuntu/Debian]

ThingsBoard-IOT-Platform

Making a Production grade IOT project is not just sending data from Device to Cloud and vice-versa, but it requires many other functionalities like

  • Proper Security Standards
  • Device Provisioning and management
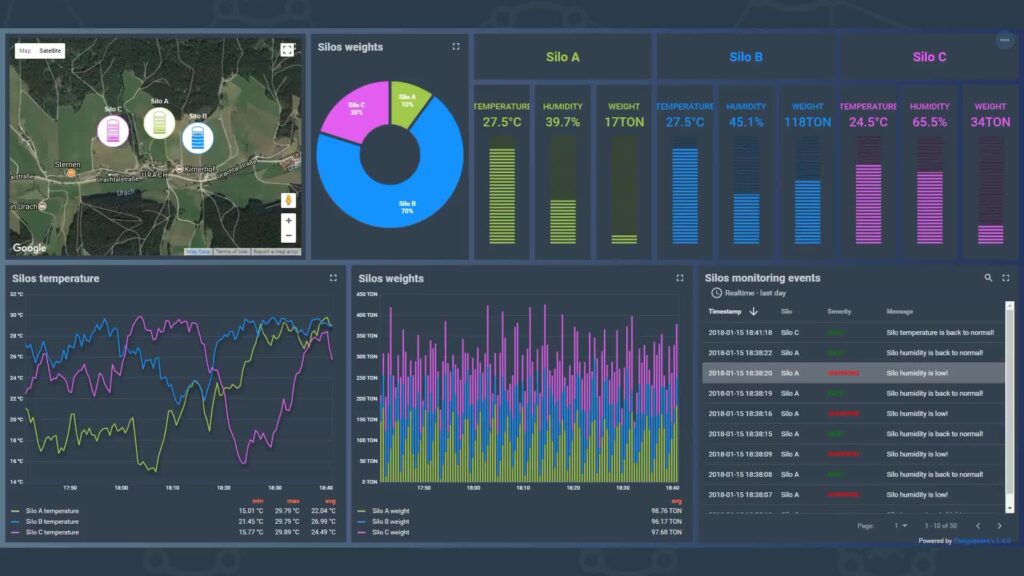
  • Storing and Visualizing telemetry data
  • Rules to be implemented on the data
  • User Management with RBA (Role Based Access)

Thankfully we already have an Open-Source IOT Platform – ThingsBoard which cater’s to all the mentioned needs and is free of cost.

ThingsBoard comes in 2 different editions:

  1. ThingsBoard Community Edition
  2. ThingsBoard Professional Edition

The Community edition is Open-Source and it’s free of cost. On the other hand, the Professional edition offers additional features but comes with a cost attached. Also, both of these Editions can be Self-Managed or can be subscribed via ThingsBoard Cloud.

Here in this Article we will learn how to setup an Instance of the Open-Sourced ThingsBoard Community Edition on a cloud VM

ThingsBoard CE on Ubuntu Virtual Machine

Step 1 : Provision and Configure a VM as follows
  • 1 vCPU
  • 1GB RAM
  • 25GB Hard Disk
  • Ports Open : 8080(platform), 1883(mqtt), 5683(coap)
Step 2 : SSH into the VM and update the repo
sudo apt update
Step 3 : Install Java 11 (OpenJDK)
sudo apt install openjdk-11-jdk
sudo update-alternatives --config java
java -version
Step 4 : ThingsBoard service installation
# Download installation package
wget https://github.com/thingsboard/thingsboard/releases/download/v3.2.2/thingsboard-3.2.2.deb

# Install ThingsBoard as a service
sudo dpkg -i thingsboard-3.2.2.deb
Step 5 : Configure PostgreSQL for ThingsBoard database
# import the repository signing key and add repository contents to your system
wget --quiet -O - https://www.postgresql.org/media/keys/ACCC4CF8.asc | sudo apt-key add -
RELEASE=$(lsb_release -cs)
echo "deb http://apt.postgresql.org/pub/repos/apt/ ${RELEASE}"-pgdg main | sudo tee  /etc/apt/sources.list.d/pgdg.list

# install and start the postgresql service
sudo apt update
sudo apt -y install postgresql-12
sudo service postgresql start

Change password for the main postgres user

sudo su - postgres
psql
\password
\q

Ctrl+D to logout from postgres user

Create ThingsBoard Database

psql -U postgres -d postgres -h 127.0.0.1 -W
CREATE DATABASE thingsboard;
\q
Step 6 : Modify the ThingsBoard config file with PostgreSQL info
sudo nano /etc/thingsboard/conf/thingsboard.conf

Add the following lines to the configuration file. Don’t forget to replace “PUT_YOUR_POSTGRESQL_PASSWORD_HERE” with your real postgres user password:

# DB Configuration 
export DATABASE_ENTITIES_TYPE=sql
export DATABASE_TS_TYPE=sql
export SPRING_JPA_DATABASE_PLATFORM=org.hibernate.dialect.PostgreSQLDialect
export SPRING_DRIVER_CLASS_NAME=org.postgresql.Driver
export SPRING_DATASOURCE_URL=jdbc:postgresql://localhost:5432/thingsboard
export SPRING_DATASOURCE_USERNAME=postgres
export SPRING_DATASOURCE_PASSWORD=PUT_YOUR_POSTGRESQL_PASSWORD_HERE
export SPRING_DATASOURCE_MAXIMUM_POOL_SIZE=5
# Specify partitioning size for timestamp key-value storage. Allowed values: DAYS, MONTHS, YEARS, INDEFINITE.
export SQL_POSTGRES_TS_KV_PARTITIONING=MONTHS
Step 7 : Setup the Queue Service

By Default we use built-in and default – In-Memory queue service. For more options check this LINK

Step 8 : [OPTIONAL] make JAVA use fixed amount of RAM

Edit ThingsBoard configuration file

sudo nano /etc/thingsboard/conf/thingsboard.conf

Add the following lines to the configuration file and save it.

# Update ThingsBoard memory usage and restrict it to 256MB in /etc/thingsboard/conf/thingsboard.conf
export JAVA_OPTS="$JAVA_OPTS -Xms256M -Xmx256M"
Step 9 : Run Installation Script

The –loadDemo flag will load sample data for tenants, customers and users.

# --loadDemo option will load demo data: users, devices, assets, rules, widgets.
sudo /usr/share/thingsboard/bin/install/install.sh --loadDemo
Step 10 : Start ThingsBoard service
sudo service thingsboard start

Now you can access your ThingsBoard instance at http://[YOUR-IP-ADDRESS]:8080

The default system admin username and password will be : sysadmin@thingsboard.org / sysadmin

Bonus: Docker Installation

Another faster deployment strategy for quickly come up with ThingsBoard Instance is using Docker Container. Just execute the below commands and your instance will be up and running.

Install Docker first : Docker for Ubuntu

mkdir -p ~/.mytb-data && sudo chown -R 799:799 ~/.mytb-data
mkdir -p ~/.mytb-logs && sudo chown -R 799:799 ~/.mytb-logs
docker run -it -p 8080:9090 -p 1883:1883 -p 5683:5683/udp -v ~/.mytb-data:/data -v ~/.mytb-logs:/var/log/thingsboard --name mytb --restart always thingsboard/tb-postgres

Now we have installed the ThingsBoard platform, but there is a whole universe to be explored about how to use ThingsBoard to make your IOT application. Read the official and well put ThingsBoard documentation.

RESIN.IO – Update your IOT Devices Remotely

Resin.io is a web server which helps to deploy our code on a variety of Linux devices connected to the platform. You can also monitor, manage and update your fleet of devices from anywhere around the world.

Resin.io can also be regarded as fleet management and remote update solution – DevOps over IOT ; So the idea is to provide tools similar to what developers use in the cloud but to make them adaptable to the embedded scenario.

Moreover, the Switch between the older and the latest version will be extremely fast (no message displaying your software is being updated)

resin.io platform

Resin.io works in 3 basic steps

1. Develop

2. Deploy

3. Manage

Lets dig deeper and find out how these things works

Here is a the DFD(data flow diagram) which shows how Resin.io platform works

resin.io data flow diagram

Google’s UriBeacon : What it is & How it Works Explained

uribeacon- the physical web

Google’s UriBeacon is a project under their Physical Web initiative whose main aim is DIGITAL to PHYSCAL convergence. The UriBeacon project was launched in 2014 to explore how to use BLE technology to share URLs. The UriBeacon protocol uses BLE to transmit a basic URL or short weblink that can be detected by nearby mobile devices. This ‘link’ can then drive a user to a web page that corresponds to content associated with that beacon.

uribeacon- the physical web

Moreover you do not need a specialized app to read that link, all you need is a UriBeacon browser which can read that URL (more and more browser will add this feature with the time). There will be 2 options in the browser to identify a UriBeacon

  • Automatic Mode – Whenever your smartphone enters in the proximity of a beacon the URL link will be notified.
  • Manual Mode – In manual mode you need to search every time you want to scan a beacon.

uribeacon with mobile app

The benefit with this approach is that one app(browser) intended to detect UriBeacons can serve all beacons regardless of what brand, or owner they are associated with.

The potential of the Physical Web Concept is huge as cost of entry and time to deploy is a couple of order of magnitude lower as compared to other technologies.

These search results could provide a jumping off point to a wealth of information, media and rich interactive content in the same way the Google results page does today. So in a nutshell these UriBeacon act as a Physical Web showing results of the locale on your mobile phone.

Anatomy Of Internet Of Things : Hardware & Services

internet of things green linked image

Internet of Things is a buzzword these days in the IT sector. With all new devices and services introduced everyday and big players of IT industry like Google and Apple launching there IOT devices, it looks like its going to be a big breakthrough in the world.

internet of things green linked image

Though many people are aware of the concept of Internet of Things but certainly they don’t have enough knowledge regarding the hardware and software used.

Here at Weock we have dissected the concept of IOT in a way so that all the scattered pieces in the mind of our audience are joined together.

The Hardware Squad

The hardware squad make up the visible section of your project. It consists of all the sensor, boards and communications devices.

A. IOT Devices

These devices make up the mainframe of you IOT project

1. Embedded System Boards

The embedded system boards are the brain of your project in which your program will run. You might even have one of these boards with you

  • Arduino
  • Raspberry Pi
  • Intel Galileo
  • Gadgeteer
  • Beaglebone
  • Cubieboard
  • Electric Imp

raspberry pi iot
Raspberry Pi

2. Wearables

These are the devices which can be worn on your body and they will collect data and give information. If you are not a hardware freak then you can buy one of these wearables and start writing programs.

  • Google Glass
  • Samsung Gear 2
  • Pebble Watch
  • Misfit Shine
  • Android Wear

samsung galaxy gear 2
Samsung Galaxy Gear 2

B. Sensors and Actuators

Sensors and Actuators are the devices which collect data and act on the environment.

(we will be explaining each of these devices very soon)


1. Sensors

Sensors collect data from environment and give the data to microcontroller for processing

  • Temperature Sensor (eg. DHT11)
  • Light (eg. LDR, IR)
  • Radio (eg. RF and FM)
  • PIR motion Sensor
  • Ultrasonic Sensor (eg. HC-SR04)
  • Air Quality Sensor

pir-sensor
PIR Sensor

2. Actuators

Actuator are electronics devices which act on the environment based on instructions given by micro-controller

  • Servo Motor
  • Gear Motor

3. Display

Used to display necessary information

  • TFT
  • 7 segment display
  • LED
  • LCD display

4. Relay and Switches

Used to turn devices ON/OFF

C. Smart Devices (connectivity)

These are modules which help in establishing communication between various devices

  • GPSgsm module iot
  • GSM
  • BLE
  • WIFI
  • GPRS
  • RFID
  • NFC


The Platform and Services Squad

These are the technologies which are currently being used in the field of Internet Of Things.

  1. RIOTifttt-logo
  2. Carriots
  3. Lithouse
  4. Sensinode
  5. IFTTT (if this than that)
  6. Arrayent
  7. Alljoyn
  8. ioBridge

Congratulations, if you read the whole article then you have successfully dissected the giant know as Internet Of Things. These are all the concepts which make up the IOT.

If you like our article then Share US among your friends and please give your suggestions and feedback.