How to Interface and Test Camera Module with Raspberry Pi 2/3/4

camera-module-raspberry-pi

Using a Camera Module with Raspberry Pi can have a variety of use-cases ranging from highly complex AI and Computer Vision to simple use-case like setting up a CCTV system. In this step-by-step guide, we will learn how to set up a Raspberry Pi camera module and test it to take a still image to verify that our module is working as expected.

The camera module has a Camera sensor which is pretty much similar to the one we have in our smartphone. And it can be used to Take Picture and Record Videos.

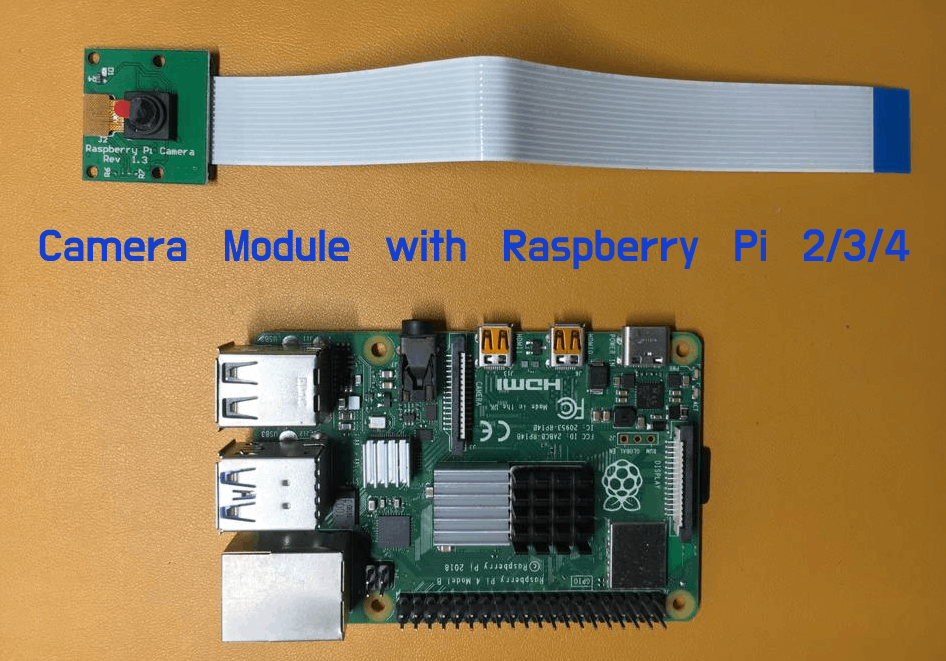
Connecting Raspberry PI camera is the first Step

On your Raspberry Pi 2/3/4 there will be 2 MIPI (Mobile Industry Processor Interface) ports :

  • MIPI DSI (Display Serial Interface)
  • MIPI CSI (Camera Serial Interface)

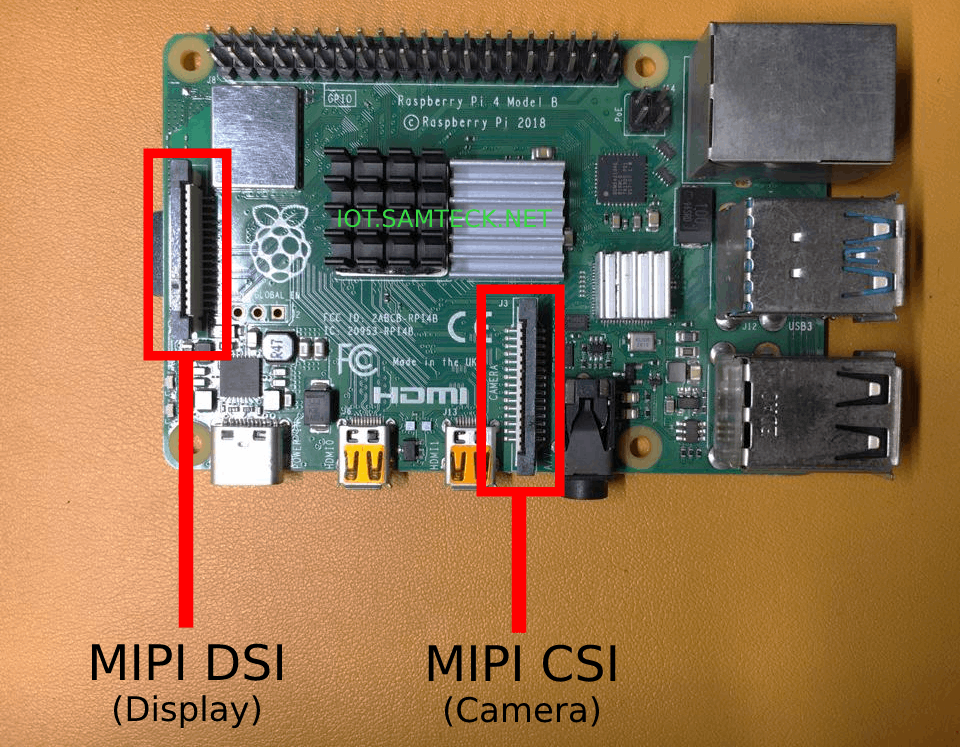
Note: Make sure to switch off your Raspberry Pi if you are doing this for the first time.

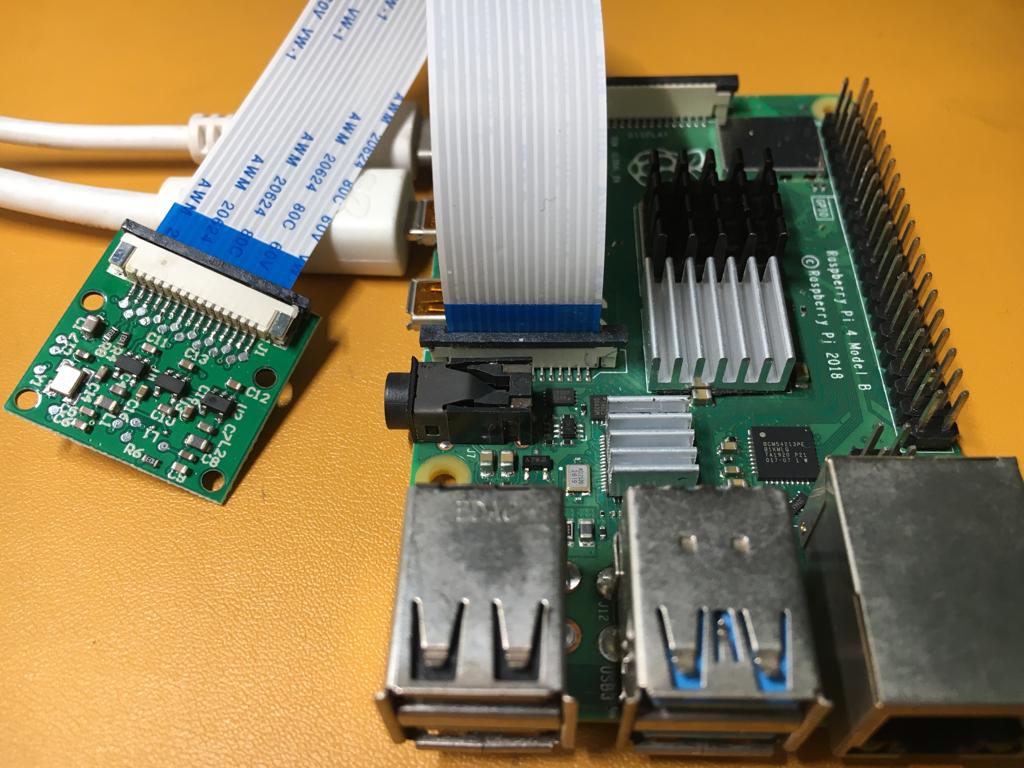
To connect the Camera Module we have to use the MIPI CSI interface (the port in the center near to the USB ports) as shown in the image.

  1. Now lift up the tab on the port a few milimeters
  2. Slide in the Camera cable (blue side of the camera connector is facing the USB ports)
  3. Push the tab back down to securly held the camera wire

Enable the Camera Interface from Raspberry Pi Configurations

To use the camera module which we attached, we first need to enable it from the Raspberry Pi Configurations.

  • Start your Raspberry Pi
  • Open Raspberry Pi Configuration
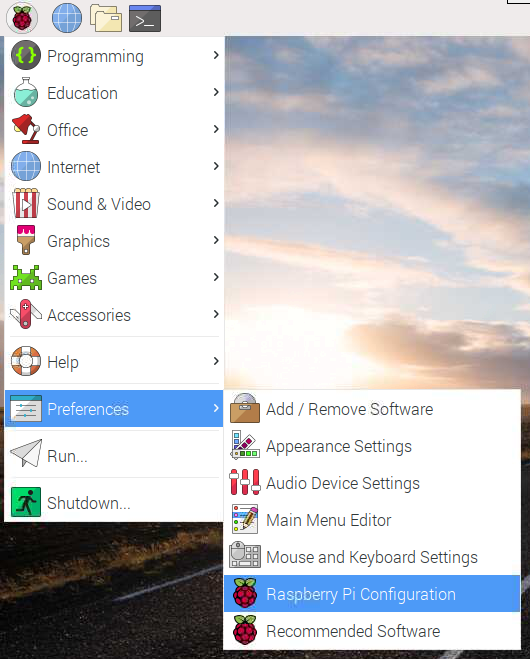
  • Enable Camera Interface
  • Reboot your Pi

Testing your Camera Module By Taking Image and Recording Video

Now it’s time to test your camera module. We will be using raspistill and raspivid tools to take images and record videos respectively (these tools are installed by default into your Raspbian OS)

Open Terminal and run below command to take a picture and image will be saved on your Desktop

raspistill -o Desktop/image.jpg

Run below command to record a video

raspivid -o Desktop/video.h264

Below are some examples of variations of the above commands

// change resolution of the image
raspistill -o Desktop/image.jpg -w 640 -h 480

// horizontal and vertical flip
raspistill -hf -vf -o Desktop/image.jpg

// record video for 5 seconds
raspivid -o Desktop/video.h264 -t 5000

// record a video for 2 seconds with vertical flip and specified resolution
raspivid -o Desktop/video.h264 -w 1280 -h 720 -vf -t 2000

Troubleshooting

  • Restart Your Pi
  • Verify your Connection
  • Try Using different RPi or Camera module (if possible)

How to Install and Configure SSH Server on a Ubuntu Desktop

ssh-protocol

We usually use SSH to access Cloud Servers or IoT gateways – like Raspberry Pi, but sometimes a situation arises where we need to SSH into our desktop for some or other reasons. Or maybe you want to install SSH Server to a Ubuntu OS for a completely different purpose. That’s fine because here we will discuss how to install and configure SSH Server for your Ubuntu Machine.

You can use this method for any version of Ubuntu, Xubuntu, Lubuntu or any other OS based on Debian. Know more about terms like – LINUX, UNIX, Debian, Ubuntu, Kernel, GNOME, GNU, APT, RPM, YUM, GNOME

ssh-protocol

3 Steps to Install and Configure SSH on Ubuntu via Terminal

  1. Install SSH-Server : sudo apt install openssh-server
  2. After installation the SSH service will start automatically, you can verify it by running sudo systemctl status ssh it will show “active running”. Press “q” to quit
  3. Now you need to enable ssh from firewall by using this command : sudo ufw allow ssh

That’s all now you can connect to your ubuntu machine by using ssh username@host-ip

Configure Visual Studio code for Arduino Development

Configure Visual Studio code for Arduino Development

These days IoT is becoming such a buzz word that many software professionals want to dive into the Embedded world. And the primitive board to start with embedded programming is ARDUINO. But the IDE which Arduino foundation provides us is basic and lacks essentials features for serious programming like Intellisense, GIT integration, code lay-outing, and necessary shortcuts.

One of the best IDE providers in the marketplace “VS Code” released an Arduino plugin to make life easier for serious programmers who want to work on Arduino. So here in this article, we will see how to install and configure VS Code for Arduino development.

Just follow the below steps and you will be up and running with a ‘Hello World’ example or Blink as they call it in Arduino world.

1. Install VS Code

Head on to https://code.visualstudio.com/download

2. Install Arduino IDE

Don’t get confused, official Arduino IDE contains some important libraries which will be used by VS Code.

Download Arduino IDE: https://www.arduino.cc/en/main/software

3. Install Arduino Extension for VS Code

Install Arduino extension for VS Code: https://marketplace.visualstudio.com/items?itemName=vsciot-vscode.vscode-arduino

This extension will also install C/C++ package as an add-on which is important for this setup.

After installing these IDE and Packages close them. Connect the Arduino board and re-launch VS Code.

4. Open Blink Example for Arduino

Not all VS Code’s functionality is accessible via menus. Instead, VS Code has a command-line-type facility for interfacing with extensions called the Command Palette.

To run the Command Palette, type “Cntrl+Shift+p” to display a drop-down box that you can enter commands in. Type “Arduino Examples” into the command palette and press return. This will open up a link to the familiar example projects – navigate to “01.Basics” and then double click on “Blink” to open the world-famous Blink project.

Once you have opened up an Arduino .ino file, VS Code reconfigures in an Arduino mode, and gives access to special functionality in its bottom blue margin, as shown in the image below.

VS-code-arduino-config

Click on <Select Programmer> and select AVR ISP (Arduino AVR Board)

Click on <Select Board Type> and select Arduino/Genuino Uno

Click on <COM> and select your Arduino serial port

At the top right of the window, you will see icons for Verify and Upload the code. All other features from Arduino IDE can be searched on Command Pallet

5. Taking Advantage of VS Code functionalities

  • Intellisense and Error Checking: IntelliSense is a code completion engine that looks through all of the source code in your project — including external libraries — and then suggests functions and variables as you type your code. Also, VS Code constantly checks your code as you write. If it detects an error, it underlines it with a red squiggle and offers advice.
  • Use a src folder to hold your code folders: Layout your project properly using a folder structure as below:-

ArduinoRootFolder
— src
——- FolderA
——- FolderB
————-SubfolderA

  • Add an ‘output’ option to arduino.json: By default, you will have an arduino.json file in your project under .vscode folder which contains build information for your project. Just add the below line to build your project in the current folder itself

,”output”: “build”

  • Gitify Your project: One powerful thing which you can do VS Code is using GIT and checking in your code without any delay. Just click the Git icon at the extreme left of the window.

That’s all you need to set up your Arduino project in a professional way. Below are some links which you can refer to if you want a more elaborative explanation.

  1. Basic Guide
  2. Advance Guide
  3. Full Comprehensive Guide

Enable SSH in Raspbian/Ubuntu without Keyboard & Monitor

ssh-into-raspberry-pi

Many times, a situation arises for an IOT developer where he/she wants to ssh onto a newly flashed raspberry pi running on Ubuntu/Raspbain but without a Monitor and keyboard or any other input device.

ssh-into-raspberry-pi

The first and foremost thing to SSH into a pi is to open port 22. But its always closed for security purposes. When we have a pi with a keyboard and monitor its easy to open the port but that isn’t the case always. Here we will explain how to open port 22 and enable ssh without any input device.

Open Port 22 in Raspbian/Ubuntu for SSH

Without wasting time we will straight tell you to steps to open port 22

  1. Prepare your sd card using Etcher and your OS image (or Mount flashed SD card)
  2. Navigate to the SD card [boot] using your OS file manager or terminal
  3. Create a new empty file named ssh, without any extension, inside the boot directory [touch /boot/ssh]
  4. Remove the SD card from your computer and put it in your Raspberry Pi.
  5. Power on your Pi board. On boot Pi will check whether this file exists and if it does, SSH will be enabled and the file is removed.

That’s it, now connect your raspberry pi to your network via LAN, find the IP address from your Router’s console and ssh onto it. If you want to SSH to your Pi from a different network – Click Here.

Configure Wifi in Debain Linux(Ubunut Server) with WPA Supplicant

wifi-wpa-supplicant

Configuring wifi is a pretty easy task when we have a Desktop Environment installed on our Linux system. But it becomes a troublesome process when we have to configure Wifi in headless mode. Here are some tools and commands to configure your wifi efficiently in any Debian Linux OS.

wifi-wpa-supplicant

We need to have a LAN connectivity via ethernet on the host computer where we need to configure Wifi.

  1. STEP 1: find the name of your Wireless Interface
    • iwconfig
    • sudo ifconfig wlan0 up   (bring wifi up)
    • sudo iwlist wlan0 scan | grep ESSID
  2. STEP 2: Connect to Wi-Fi Network With WPA_Supplicant
    • sudo apt install wpasupplicant
    • wpa_passphrase your-ESSID your-wifi-passphrase | sudo tee /etc/wpa_supplicant.conf
    • sudo wpa_supplicant -B -c /etc/wpa_supplicant.conf -i wlan0
    • sudo dhclient wlan0   (obtain IP address)
    • sudo dhclient wlan0 -r   (release IP address)

For more info like starting this service at boot time and obtain a status IP address head on to this Awesome Article

Make SSH connection on Public Internet (WAN) without Port Forwarding

remote-ssh-raspberry-pi

Making an SSH connection is something elementary while developing an IOT project, just open the port 22 install an SSH server and you are ready to go. But sometimes you need to access a device which is behind a router on Public internet. One scenario is you want to access a device that is present in a different city or a country.

remote-ssh-raspberry-pi

For this situation, we will use a VPN managed service from remote.it (this service creates a VPN between itself and your device, and let you access that device from its dynamic address)

STEP 1: Create a free developer account and install the remote.it service on your device by clicking add device option.

For raspberry pi just execute the below line

sudo apt update && sudo apt install -y connectd && sudo connectd_installer

STEP 2: Sign-in to the service using your credentials for remote.it on your terminal.

STEP 3: Select the Application (Port you want to open). Also, you can map any device in your LAN(ex. router homepage) to any application.

STEP 4: On the Web Console, click on DEVICE -> Device Name -> Service. Then from the window copy, the remote address and you are good to go.

Additional Official Documentation: HERE

Docker : Installation, Pull and Run a Container from Docker HUB

docker-install

Installation of Docker is pretty straightforward. In this article we will be focusing on Linux installation for docker. Do check below links for docker installation in other OS

-Install Docker on Ubuntu

-Install Docker on Windows

-Install Docker on MacOS

-Install Docker on Raspbian (Raspberry PI)

Alternatively, for Linux/Raspberry Pi just run this command and you are good to go

curl -sSL https://get.docker.com | sh

docker-install

Follow the below instructions to install docker on linux machine [OPTIONAL]

1. Add GPG keys for official docker repo

curl -fsSL https://download.docker.com/linux/ubuntu/gpg | sudo apt-key add -

2. Add docker repo to apt sources

sudo add-apt-repository "deb [arch=amd64] https://download.docker.com/linux/ubuntu $(lsb_release -cs) stable"

3. Update package database

sudo apt-get update

4. Install Docker

sudo apt-get install -y docker-ce

Moreover you can check the full installation HERE


Basic Commands to check Docker Installation

Check weather docker is installed and running (to quit CTRL+C)

sudo systemctl status docker

List Docker (list of docker commands, also management command-since docker 2017)

sudo docker

Docker Version (returns the version of client and server (engine/daemon/service)

sudo docker version

Docker Info (returns details about our configuration and setup for our engine)

sudo docker info

Docker Daemon Start/Stop

Docker has 2 components :
1. Docker Daemon (Engine) : This is the core of Docker which runs in the background
2. Docker CLI (Client) : Docker component with which user interacts

docker-cli-daemon

Both these components communicate with each other using REST API’s on Port number – 2376

START Docker Daemon

sudo service docker start

STOP Docker Daemon

sudo service docker stop

Running a Container

Before running a Container we need to have a Docker Image (as container is a runtime instance of docker image), we can not run a container without having a Docker Image , cause that will not make any sense.

So here are some Commands for for Docker Images

View Docker Images present on our computer

sudo docker images
sudo docker images ls

View details of Docker Image present

sudo docker inspect ImageID

Delete Docker image from System

sudo docker rmi ImageID

So now that we know about docker images lets see how to run them, and no worries if you don’t have any image in you system (we have that covered)


Docker RUN command

Here is the most important docker command which is used to Run Images and if that image is not present locally on you system then docker run will download it from dockerhub and run it

sudo docker run -it Image

We can attach additional parameter as -d (for detach mode) , -p (to map port of docker and host)

To give it a try, run ubuntu image (if its not present locally, which i guess not, then it will download and run that command)

sudo docker run centos –it /bin/bash

This command will download the centOS image from docker hub and start an interactive session at /bin/bash

Alternatively, if you want only to pull image and not run it, you can use the below command. Also this command can also be used when your local system has a outdated image and you want to update you local copy with updated copy.

sudo docker pull centos

Thats all for this session, in next tutorial we will explore more into containers.