How to Install and Configure SSH Server on a Ubuntu Desktop

ssh-protocol

We usually use SSH to access Cloud Servers or IoT gateways – like Raspberry Pi, but sometimes a situation arises where we need to SSH into our desktop for some or other reasons. Or maybe you want to install SSH Server to a Ubuntu OS for a completely different purpose. That’s fine because here we will discuss how to install and configure SSH Server for your Ubuntu Machine.

You can use this method for any version of Ubuntu, Xubuntu, Lubuntu or any other OS based on Debian. Know more about terms like – LINUX, UNIX, Debian, Ubuntu, Kernel, GNOME, GNU, APT, RPM, YUM, GNOME

ssh-protocol

3 Steps to Install and Configure SSH on Ubuntu via Terminal

  1. Install SSH-Server : sudo apt install openssh-server
  2. After installation the SSH service will start automatically, you can verify it by running sudo systemctl status ssh it will show “active running”. Press “q” to quit
  3. Now you need to enable ssh from firewall by using this command : sudo ufw allow ssh

That’s all now you can connect to your ubuntu machine by using ssh username@host-ip

Enable SSH in Raspbian/Ubuntu without Keyboard & Monitor

ssh-into-raspberry-pi

Many times, a situation arises for an IOT developer where he/she wants to ssh onto a newly flashed raspberry pi running on Ubuntu/Raspbain but without a Monitor and keyboard or any other input device.

ssh-into-raspberry-pi

The first and foremost thing to SSH into a pi is to open port 22. But its always closed for security purposes. When we have a pi with a keyboard and monitor its easy to open the port but that isn’t the case always. Here we will explain how to open port 22 and enable ssh without any input device.

Open Port 22 in Raspbian/Ubuntu for SSH

Without wasting time we will straight tell you to steps to open port 22

  1. Prepare your sd card using Etcher and your OS image (or Mount flashed SD card)
  2. Navigate to the SD card [boot] using your OS file manager or terminal
  3. Create a new empty file named ssh, without any extension, inside the boot directory [touch /boot/ssh]
  4. Remove the SD card from your computer and put it in your Raspberry Pi.
  5. Power on your Pi board. On boot Pi will check whether this file exists and if it does, SSH will be enabled and the file is removed.

That’s it, now connect your raspberry pi to your network via LAN, find the IP address from your Router’s console and ssh onto it. If you want to SSH to your Pi from a different network – Click Here.

What are SSH Keys and How to use them

ssh_keys

Most of you guys must have logged onto servers using SSH protocol and verified yourself with a Password. Everything seems good, but don’t you sometimes feel a bit frustrated when every-time you have to enter the password, also entering the password is not the best way in terms of security (storing a password in scripts which auto logins to a server is not a good idea). That’s where the concept of SSH Keys comes into the picture.

ssh_keys

‘SSH keys’ is one of the many ways of authenticating, while logging to a remote server over the internet. SSH keys work on the principle of Asymmetric cryptography where client and server have different keys and authentication is successful as long as these 2 keys fit the formula (as both of these keys are derived from a mathematical formula). Now we will see how to use SSH keys as a method of authentication.

STEP 1: Generate an SSH key pair

ssh-keygen -t rsa

This command will generate 2 keys under a hidden folder named ‘.ssh/‘ in your home directory. Before generating new keys its best to check if any previous keys are present (cd ./ssh)

The 2 generated keys are as follows :

PUBLIC KEY (id_rsa.pub): This key is given to the system (server) to which we are trying to connect.

PRIVATE KEY (id_rsa): This key is stored on the system from which we are trying to connect.

STEP 2: Upload the Public key on Server

Now you need to upload the Public Key to the server to which your client will connect. eg: while configuring ssh keys on Github we paste the public key in Github’s ssh keys settings.

ssh-copy-id root@172.20.10.2

ssh-copy-id uses the SSH protocol to connect to the target host and upload the SSH user key. This command edits the authorized_keys file on the server. It creates the .ssh directory if it doesn’t exist. It creates the authorized keys file if it doesn’t exist. Effectively, copying the public key to the server.

STEP 3: Connecting to the Server

When the client tries to connect to the server, below sequence of operations take place

ssh-authentication

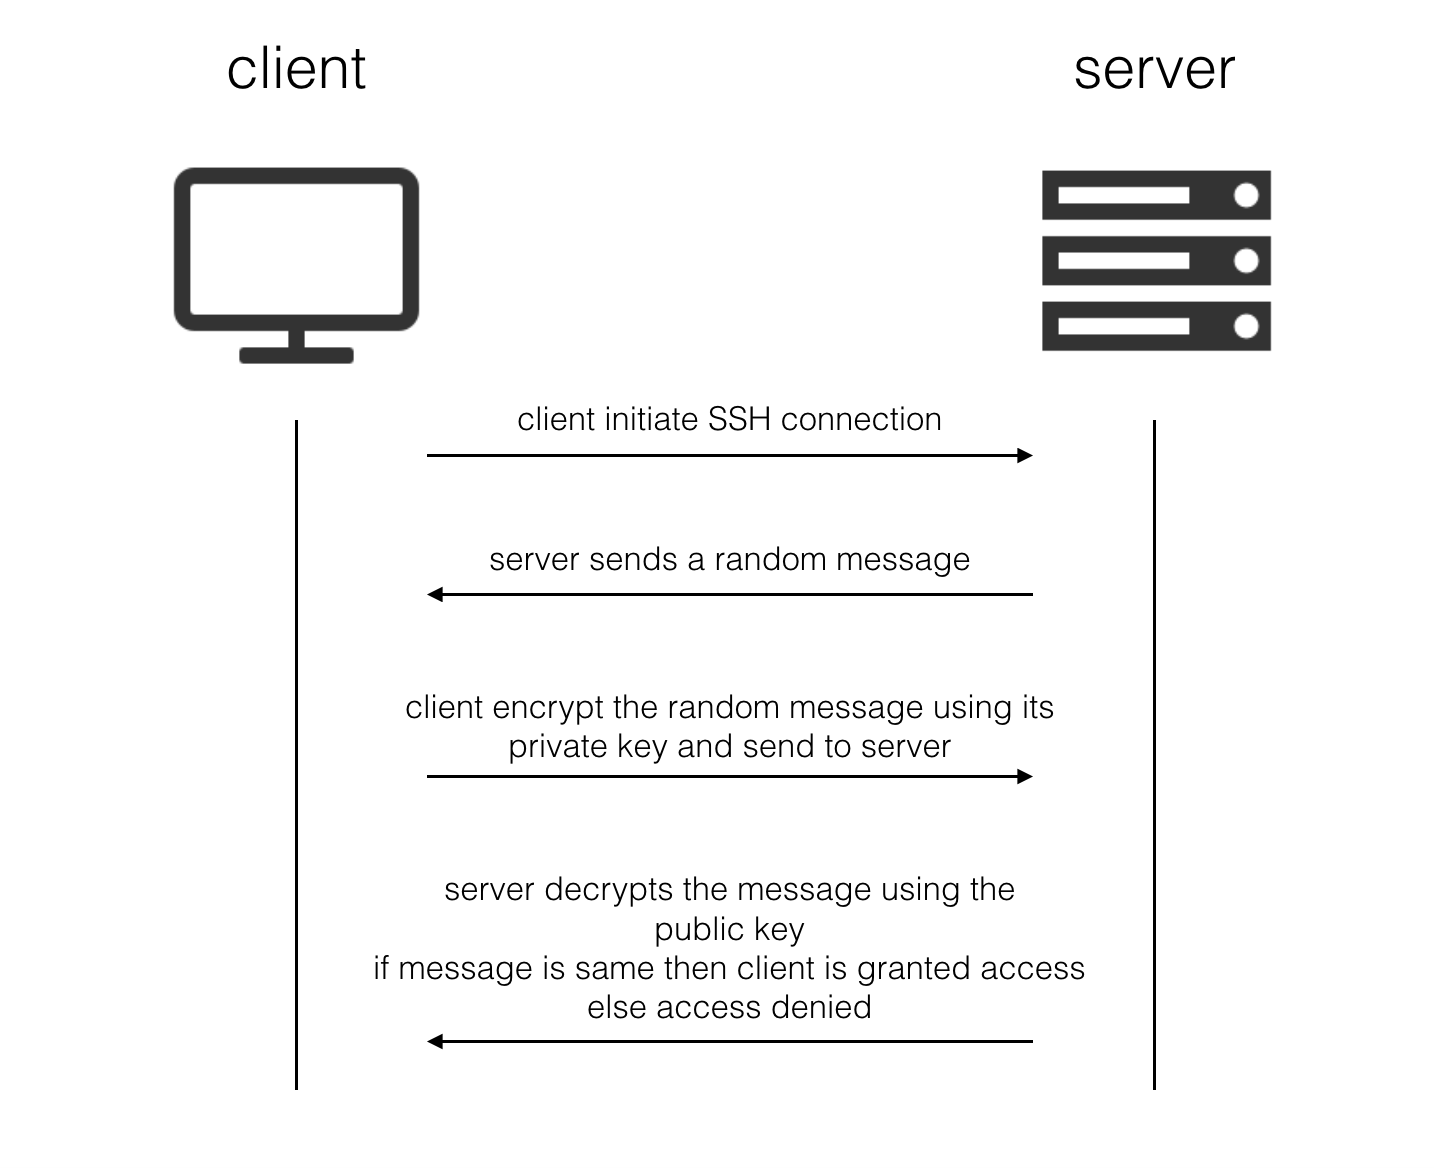
This creates an authentication mechanism based on “something you have” (the private key file) as opposes to “something you know” (a password or phrase). The best authentication mechanisms contain a component of both – this is why ssh-keygen prompts you for a passphrase to encrypt the private key.


NOTE: After the client is authenticated by the server an SSH tunnel is established. The data send over SSH is encrypted with a session key(which is shared between client and server after establishing the connection). Also, the session key uses a symmetrical cryptography technique.

Introduction to SSH (Secure Shell) Protocol

We have many times logged onto servers via ssh command using our terminal or if you are a windows user you must have used putty to login to any cloud servers (AWS for example).  But do we know how exactly SSH protocol works?

ssh-protocol

SSH stands for Secure Shell which is a secure way of connecting to a public server over the internet. SSH is widely used by network administrators for managing systems and applications remotely, allowing them to log into another computer over a network, execute commands and move files from one computer to another.

SSH works on Client-Server model: Client is where the session is displayed and Server is where session runs. SSH by default runs on TCP port 22.


The most basic use of using ssh is ssh username@server

ssh root@172.20.10.2

This command will cause the client to connect to the server (172.20.10.2) with the username (root) given. Afterwards, for first-time connections the user will be prompted with the remote host’s public key fingerprint and prompted to connect, despite there having been no prior connection:

The authenticity of host '172.20.10.2' cannot be established.
DSA key fingerprint is 01:23:45:67:89:ab:cd:ef:ff:fe:dc:ba:98:76:54:32:10.
Are you sure you want to continue connecting (yes/no)?

Answering “yes” to the prompt will cause the session to continue and the host key is stored in the local system’s known_hosts file. This is a hidden file, stored by default in a hidden directory, called /.ssh/known_hosts, in the user’s home directory. Once the host key has been stored in the known_hosts file, the client system can connect directly to that server again without the need for any approvals: the host key authenticates the connection. Afterwards, it will prompt you to enter the password and a secure connection will be established.

The known_hosts files can sometimes be exploited by hackers. Also adding username and password in automated scripts can put your server to risk as anyone with access to source code can view those details.

To overcome these problems we use SSH KEYS (click for more info).