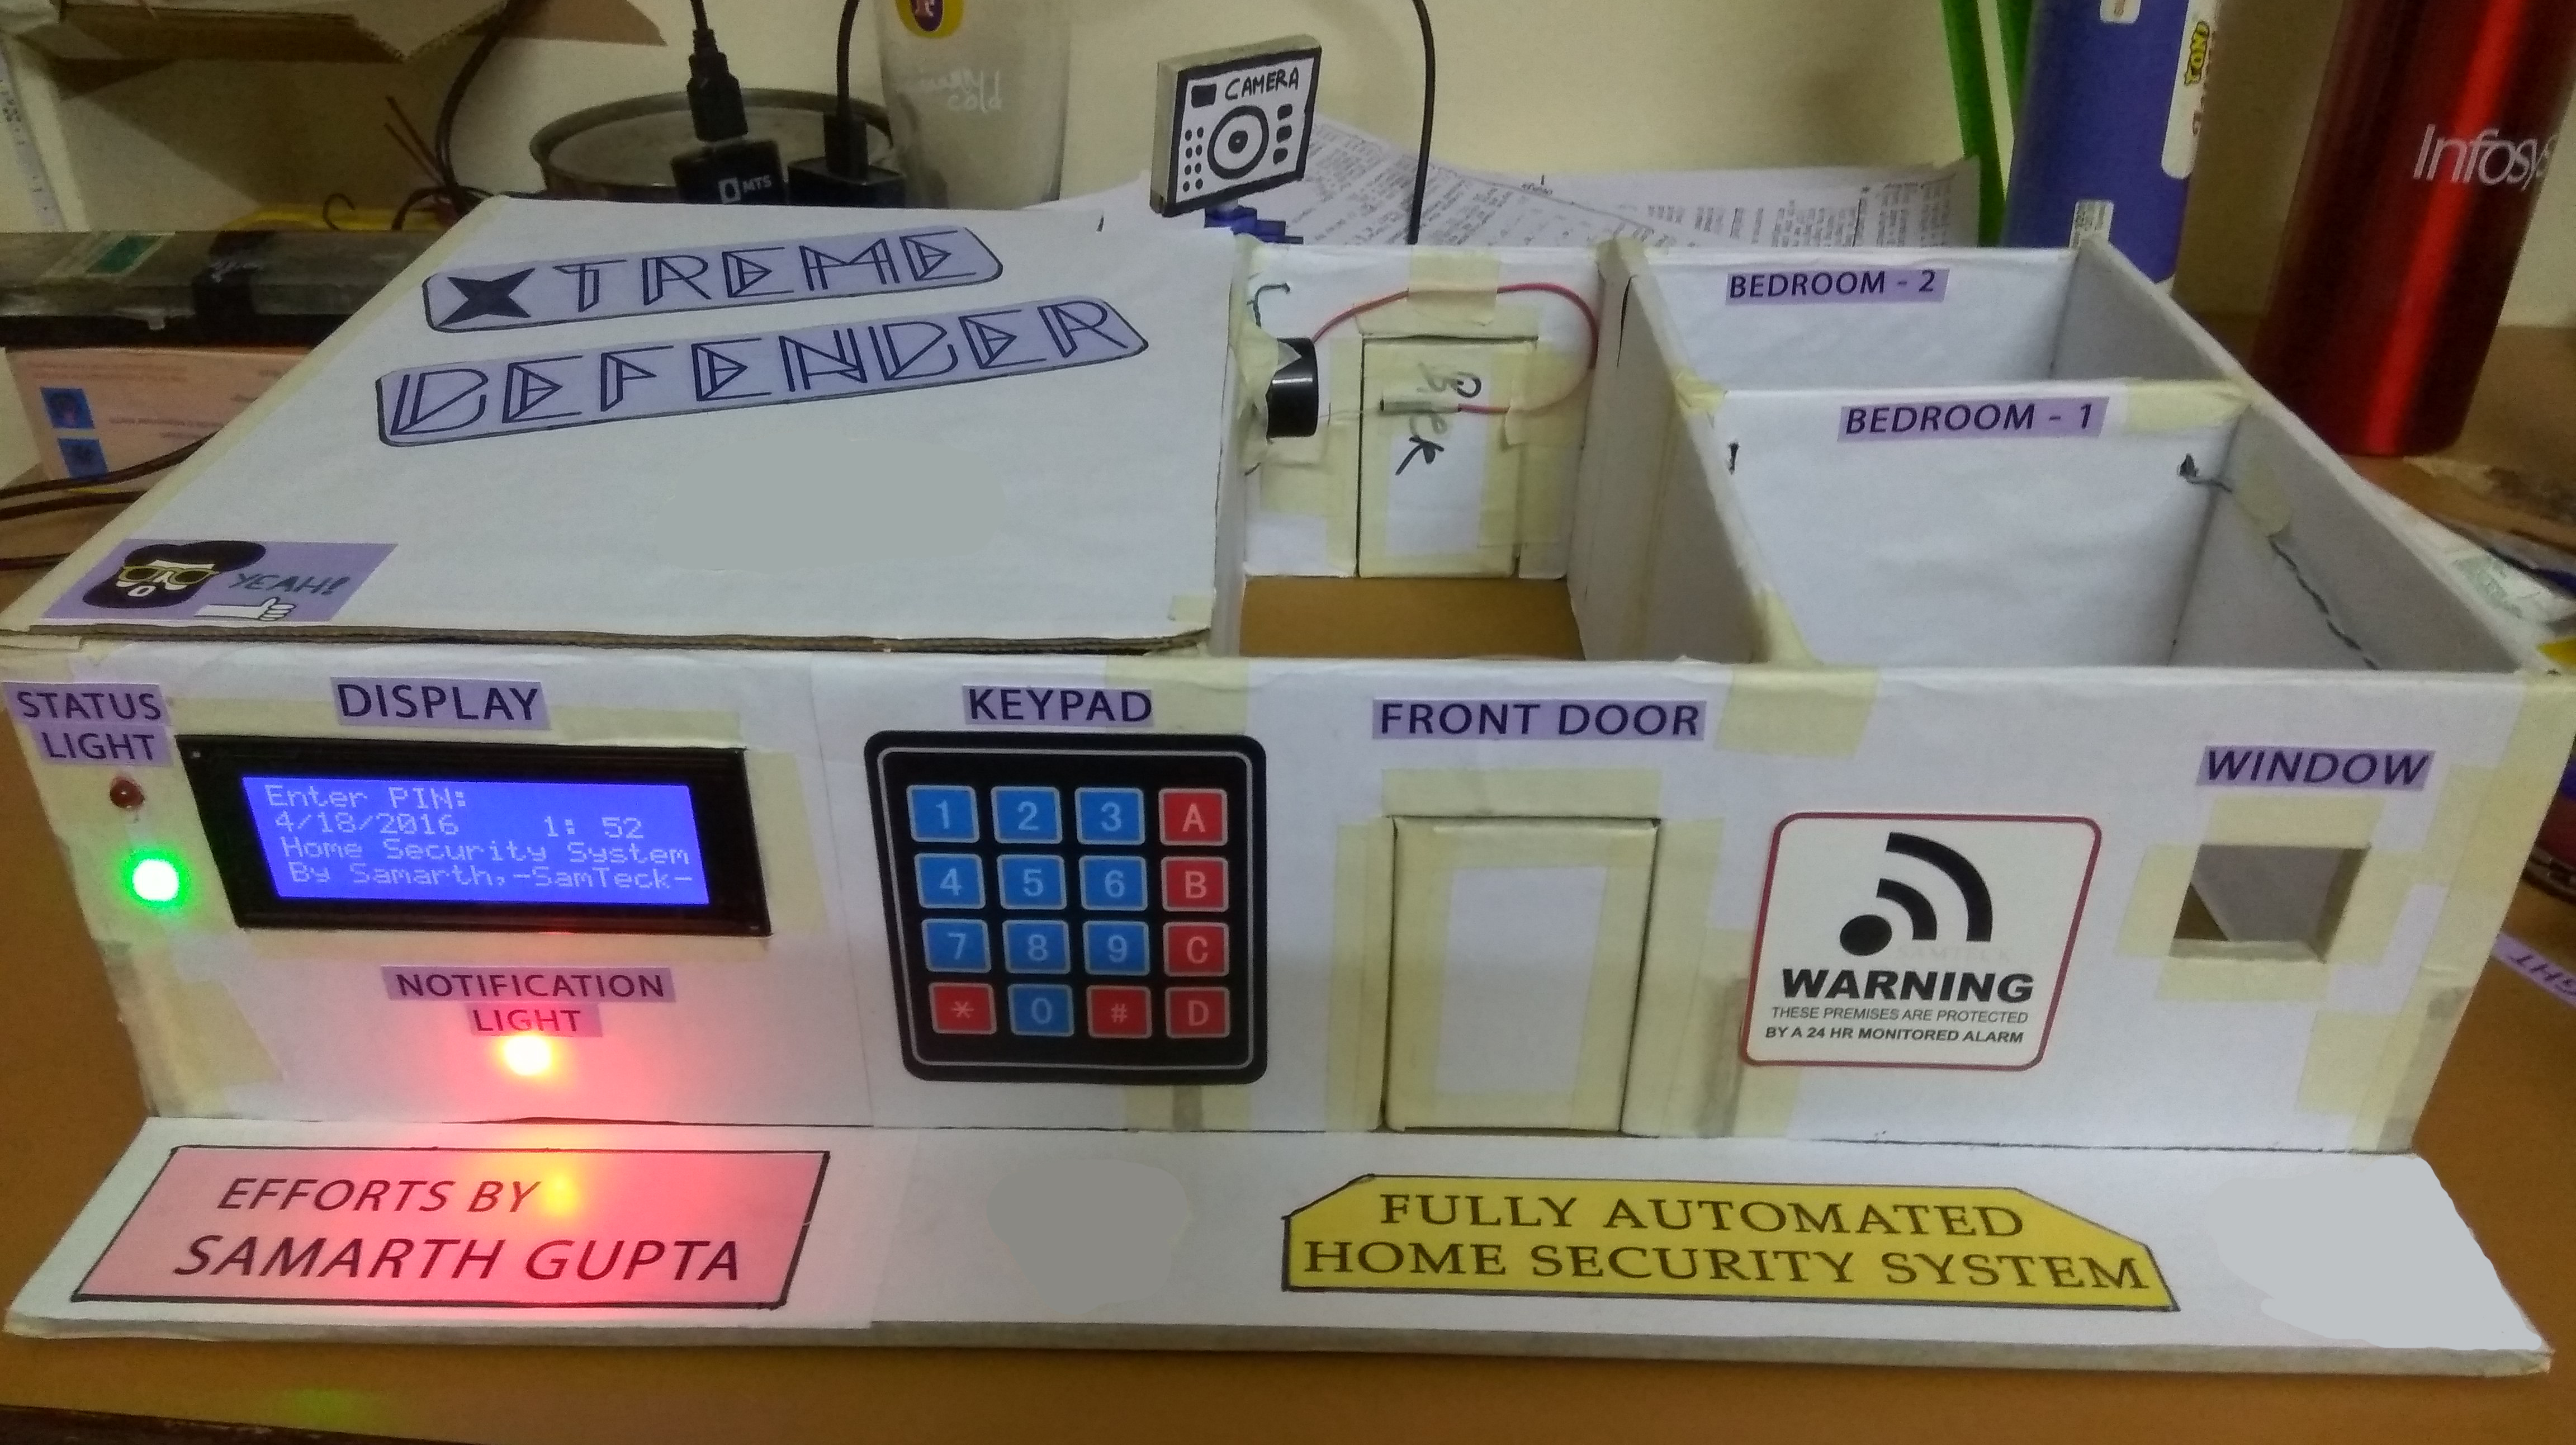
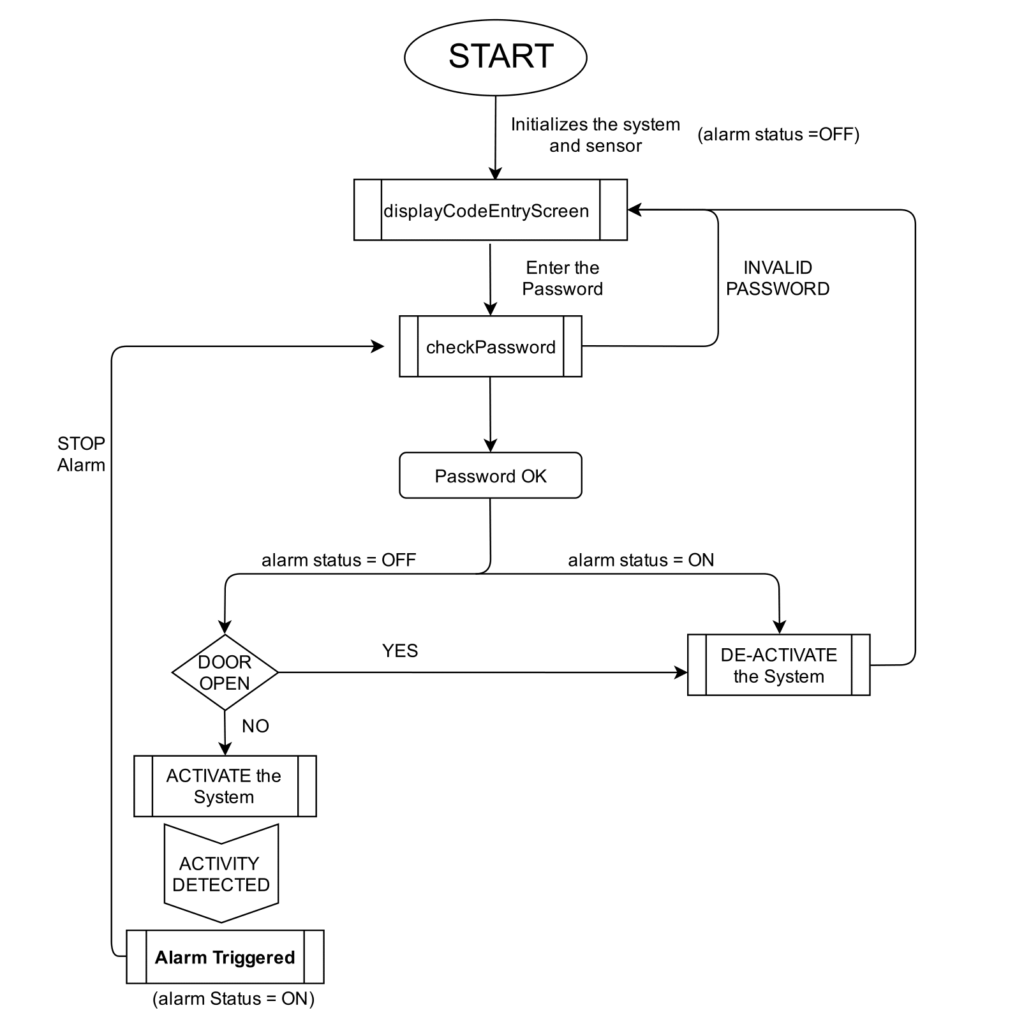
Here is the process flow of the Xtreme Defender
And here is the full code of this project (arduino sketch)
/*
* Copyright (C) 2016 Samarth Gupta
* Project Title: Xtreme Defender - Home Security System
* Author: Samarth Gupta
* Started Date: 15/4/16
* Project Sponsored by - www.samteck.net
* Version: 1.0
*/
/////////////////////////////////////////////////////////////////////////
#include<LiquidCrystal.h>
#include<Wire.h>
#include<Password.h>
#include<Keypad.h>
#include<Servo.h>
#include "RTClib.h"
//-----Declaring Global Variables-----//
//Keypad
Password password = Password("1234"); //Delared the password for system
const byte ROWS = 4; //Delared the number of rows in keypad
const byte COLS = 4; //Delared the number of colums in keypad
char keys[ROWS][COLS] = { {'1','2','3','A'}, //telling the arduino about the keys of keypad
{'4','5','6','B'},
{'7','8','9','C'},
{'*','0','#','D'} };
byte rowPins[ROWS] = {46,47,48,49}; //Rows pins connection to Arduino
byte colPins[COLS] = {50,51,52,53}; //Columns pins connection to Arduino
Keypad keypad = Keypad(makeKeymap(keys),rowPins,colPins,ROWS,COLS); //Making the keypad object
//Servo
Servo myservo;
int pos = 90; //initial position of servo at Right angle
//Real time Clock
RTC_DS1307 RTC;
//LCD Display
LiquidCrystal lcd(7,8,9,10,11,12); //Assigning the various pins of LCD to Arduino
int passwd_pos = 15; //password position on the LCD
//Notifications LED
int redPin = 29; //connect red pin of LED to pin no. 29 on arduino
int bluePin = 31; //connect blue pin of LED to pin no. 31 on arduino
int ledDelay = 50;//delay the led time by 50ms
//Staus Light
int greenLED = 37; //connect green LED to pin no. 37 on arduino
int redLED = 38; //connect red LED to pin no. 38 on arduino
//PIR Sensors
int pirPin1 = 39; //connect pir 1 to pin no 39 in arduino
int pirPin2 = 34; //connect pir 2 to pin no 34 in arduino
//Door Switches
int door1 = 41; //door 1 switch is connected to pin no 41 on arduino
int door2 = 42; //door 2 switch is connected to pin no 42 on arduino
//Speaker
int speakerPin = 35; //alaram speaker is connected to pin no 35;
//Blue anbient light Relay connection
int relay = 4; //Connect pin 4 of arduino to realy board
//Other variables
int alarmStatus = 0; //setting these variables to 0
int zone = 0;
int alarmActive = 0;
//-----Beginning setup Function-----//
void setup(){
Serial.begin(9600); //send data to computer via serial communication at 9600bps
lcd.begin(20, 4); //Telling the size of the LCD by samteck
Wire.begin(); //Setting up I2C communication with Arduino
RTC.begin(); //Start getting time form RTC module
RTC.adjust(DateTime(__DATE__,__TIME__));//Set the time on RTC to compile time
myservo.attach(2); // attaches the servo on pin 2 to the servo object
myservo.write(pos);
//setting up pin modes of LED Lights
pinMode(redPin,OUTPUT);
pinMode(bluePin,OUTPUT);
pinMode(redLED,OUTPUT);
pinMode(greenLED,OUTPUT);
pinMode(speakerPin,OUTPUT);
pinMode(relay,OUTPUT);
//setting pinmode of sensors and switches
pinMode(pirPin1,INPUT); //Bedroom 1
pinMode(pirPin2,INPUT); //Garage
pinMode(door1,INPUT); //Front door
pinMode(door2,INPUT); //Back door
digitalWrite(redLED,LOW);
digitalWrite(greenLED,HIGH);
digitalWrite(speakerPin,LOW);
digitalWrite(relay,HIGH);
digitalWrite(pirPin1,LOW);
digitalWrite(pirPin2,LOW);
calibration(); //call the calibration function to PIR initialization
displayCodeEntryScreen(); //display the starting screen
keypad.addEventListener(keypadEvent); //add an event listener for this keypad
}
//-----Beginning loop Function-----//
void loop(){
DateTime now = RTC.now(); //take current time and date from RTC module
digitalWrite(redPin,HIGH);
digitalWrite(bluePin,HIGH);
//Setting the date and time
lcd.setCursor(0,1);
lcd.print(now.day(),DEC);
lcd.print('/');
lcd.print(now.month(),DEC);
lcd.print('/');
lcd.print(now.year(),DEC);
lcd.print(' ');
lcd.setCursor(13,1);
lcd.print(now.hour(),DEC);
lcd.print(':');
lcd.setCursor(16,1);
lcd.print(now.minute(),DEC);
keypad.getKey(); //get key press from keypad
if(alarmActive==1){
if(digitalRead(pirPin1)==HIGH)
{
zone=0;
alarmTriggered();
}
if(digitalRead(door2)==LOW)
{
zone=1;
alarmTriggered();
}
if(digitalRead(door1)==LOW)
{
zone=2;
alarmTriggered();
}
if(digitalRead(pirPin2)==HIGH)
{
zone=3;
alarmTriggered();
}
}
}
////////////// Here comes Functions ////////////////
void keypadEvent(KeypadEvent eKey){
switch(keypad.getState()){
case PRESSED:
if(passwd_pos - 15 >=5){
return;
}
lcd.setCursor((passwd_pos++),0);
switch(eKey){
case '#':
passwd_pos=15;
checkPassword();
break;
case '*':
password.reset();
passwd_pos=15;
break;
default:
password.append(eKey);
lcd.print("*");
}
}
}
void checkPassword(){ //to check if correct pin is entered or not
if(password.evaluate()){
if(alarmActive==0 && alarmStatus==0){
activate();
}
else if(alarmActive==1 || alarmStatus==1){
deactivate();
}
}
else{
invalidCode();
}
}
void activate(){ //to activate the system if correct pin is entered
if((digitalRead(door1)==HIGH) && (digitalRead(door2)==HIGH)){
digitalWrite(redLED,HIGH);
digitalWrite(greenLED,LOW);
digitalWrite(2,HIGH);
lcd.setCursor(0,0);
lcd.print("SYSTEM ACTIVE !!!!!");
alarmActive=1;
password.reset();
delay(2000);
}
else{
if(digitalRead(door1)==LOW && digitalRead(door2)==LOW){
lcd.clear();
lcd.setCursor(0,1);
lcd.print(" BOTH Door Open ");
lcd.setCursor(0,2);
lcd.print("Close & Reactivate");
}
else if(digitalRead(door1)==LOW){
lcd.clear();
lcd.setCursor(0,1);
lcd.print(" FRONT Door Open ");
lcd.setCursor(0,2);
lcd.print("Close & Reactivate");
}
else{
lcd.clear();
lcd.setCursor(0,1);
lcd.print(" BACK Door Open ");
lcd.setCursor(0,2);
lcd.print("Close & Reactivate");
}
delay(2000);
deactivate(); //if door are open then system will not activate
}
}
void deactivate(){ // to deacivate the system
alarmStatus=0;
digitalWrite(redLED,LOW);
digitalWrite(greenLED,HIGH);
lcd.clear();
lcd.setCursor(0,0);
lcd.print(" SYSTEM DEACTIVATED!");
digitalWrite(speakerPin,LOW);
alarmActive=0;
password.reset();
delay(5000);
digitalWrite(relay,HIGH);
displayCodeEntryScreen(); //basically restarts the system
}
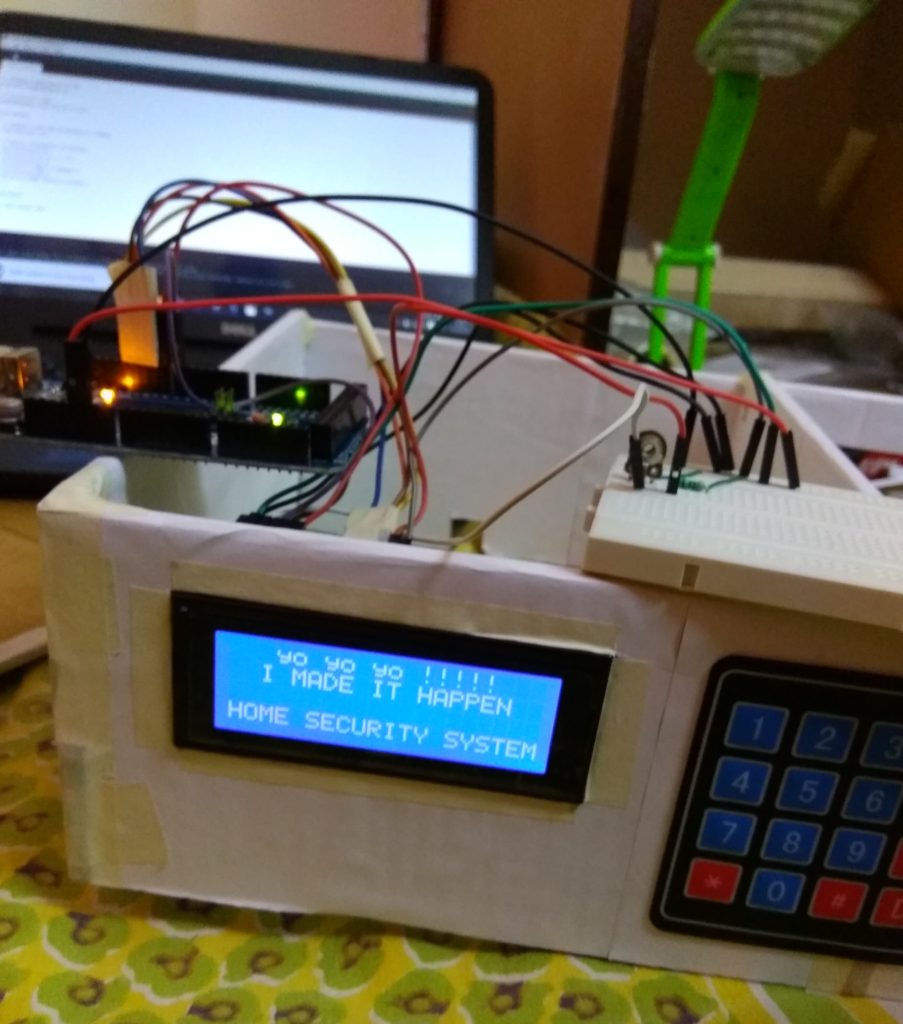
void displayCodeEntryScreen(){ //show up the first screen on the boot
lcd.clear();
lcd.setCursor(0,0);
lcd.print("Enter PIN:");
lcd.setCursor(0,2);
lcd.print("Home Security System");
lcd.setCursor(0,3);
lcd.print("By Samarth,-SamTeck-");
}
void invalidCode(){ //display when invalid code is entered
password.reset();
lcd.clear();
lcd.setCursor(1,0);
lcd.print("INVALID CODE! LOL!");
lcd.setCursor(5,2);
lcd.print("TRY AGAIN!");
digitalWrite(greenLED,LOW);
digitalWrite(redLED,HIGH);
delay(2000);
digitalWrite(redLED,LOW);
delay(1000);
displayCodeEntryScreen();
}
void alarmTriggered(){ //this function is called whenever input is received on any of the sensor
int expected_pos;
int incr;
digitalWrite(speakerPin,HIGH);
digitalWrite(relay,LOW);
digitalWrite(redPin,HIGH);
digitalWrite(bluePin,LOW);
password.reset();
alarmStatus=1;
lcd.clear();
lcd.setCursor(0,2);
lcd.print(" SYSTEM TRIGGERED ");
lcd.setCursor(0,4);
if(zone==0)
{
expected_pos=95;
lcd.print("Motion in Bedroom 1 ");
delay(1000);
}
else if(zone==1)
{
expected_pos=60;
lcd.print(" Back Door Open");
delay(1000);
}
else if(zone==2)
{
expected_pos=70;
lcd.print(" Front Door Open");
delay(1000);
}
else if(zone==3)
{
expected_pos=10;
lcd.print(" Motion in Garage ");
delay(1000);
}
//setting up position for Servo motor
if(expected_pos > pos)
incr=1;
else
incr=-1;
for(pos=pos; pos != expected_pos; pos += incr)
{
myservo.write(pos);
delay(5);
}
StrokeLight();
}
void StrokeLight(){ //Stroke LED Lights
digitalWrite(redPin, HIGH); // turn the red light on
delay(ledDelay); // wait 50 ms
digitalWrite(redPin, LOW); // turn the red light off
delay(ledDelay); // wait 50 ms
digitalWrite(redPin, HIGH); // turn the red light on
delay(ledDelay); // wait 50 ms
digitalWrite(redPin, LOW); // turn the red light off
delay(ledDelay); // wait 50 ms
digitalWrite(redPin, HIGH); // turn the red light on
delay(ledDelay); // wait 50 ms
digitalWrite(redPin, LOW); // turn the red light off
delay(ledDelay); // wait 50 ms
delay(10); // delay midpoint by 100ms
digitalWrite(bluePin, HIGH); // turn the blue light on
delay(ledDelay); // wait 50 ms
digitalWrite(bluePin, LOW); // turn the blue light off
delay(ledDelay); // wait 50 ms
digitalWrite(bluePin, HIGH); // turn the blue light on
delay(ledDelay); // wait 50 ms
digitalWrite(bluePin, LOW); // turn the blue light off
delay(ledDelay); // wait 50 ms
digitalWrite(bluePin, HIGH); // turn the blue light on
delay(ledDelay); // wait 50 ms
digitalWrite(bluePin, LOW); // turn the blue light off
delay(ledDelay); // wait 50 ms
}
void calibration(){
int i=0;
lcd.clear();
lcd.setCursor(5,0);
lcd.print("WELCOME TO");
lcd.setCursor(0,1);
lcd.print("Xtreme Defender 666");
lcd.setCursor(0,2);
lcd.print(" A Fully Automated ");
lcd.setCursor(0,3);
lcd.print("Home Security System");
delay(5000);
lcd.clear();
lcd.setCursor(0,0);
lcd.print("LOADING BOOTSTRAP");
lcd.setCursor(0,1);
for(i=0;i<20;i++){
lcd.print(".");
delay(150);
}
lcd.setCursor(0,2);
lcd.print("LOADING NCC. FILES");
lcd.setCursor(0,3);
for(i=0;i<20;i++){
lcd.print(".");
delay(100);
}
delay(1000);
for(i=0;i<=100;i++){
lcd.clear();
lcd.setCursor(0,0);
lcd.print("Initializing .......");
lcd.setCursor(0,1);
lcd.print("PIR Sensors");
lcd.setCursor(0,2);
lcd.print(i);
lcd.print("%");
delay(50);
}
lcd.setCursor(8,2);
lcd.print("--OK DONE--");
delay(500);
lcd.setCursor(0,3);
lcd.print("LOADING START SCREEN");
delay(1500);
}