In the previous post we read about how to pull and run a container with single RUN command. Here we will see how to build a container from scratch, perform operation on that container and push our container to docker hub.

Before we dive deeper, we need to understand that container is only runtime instance of a Image. And same image can be used to create multiple containers.Also, Each container is identified with a unique Container ID.
To list all the running containers
sudo docker ps
To list all the containers dead or alive
sudo docker container ls -all
Commands to perform operations on Continers
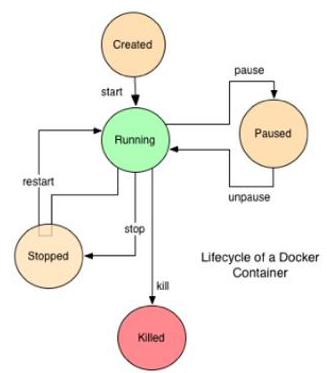
Docker container is formed when we create a runtime instance of Image. Here is life cycle of a docker contianer

Here are all the operations which can be performed on docker container (you can get containerID by using the command – sudo docker container ls -al)
Go inside a Container (attach to a container)
sudo docker attach containerID
Top processes within a container
sudo docker top containerID
Stop a running container
sudo docker stop containerID
Delete a Container
sudo docker rm containerID
Check stats of a container (CPU/mem)
sudo docker stats containerID
Pause processes in running contianer
sudo docker pause containerID
Un-Pause processes in running contianer
sudo docker unpause containerID
Kill processes inside a container
sudo docker kill containerID
Building you own Docker Images
There are tonnes of images available on Docker HUB but you can always create your own image and then push it to docker hub.
Docker images are always created with a file called Dockerfile (D capital). You can have docker file in any directory of your system but your docker file will be stored by docker daemon in your local docker registry.
Editing of Docker file Check Here.
For now we will see how to build a Docker Image with Dockerfile. CD to the directory where your Dockerfile is stored and fire the build command (-t used to tag the image with the name dockerImage)
sudo docker build -t dockerImage
This docker Image will now be stored in our local docker registry (can be checked by – sudo docker images)
Pushing Docker Image to Docker Hub
Now that we have created our image in local registry, we will upload it to the Docker HUB so that it is available on the cloud
First create a account on docker hub and then login to docker hub from your local PC
sudo docker login
There is a notation for all the images present on dockerhub – username/imageName:tag
Now we will tag our image (it will take local image and tag it as Dockerhub image locally)
sudo docker tag dockerImage username/imageName:tag
Finally we will push our image to Dockerhub
sudo push username/imageName:tag
Now if somebody wants to run our image in their system, they just have to execute run command and our docker image will be first pulled and then run into the system
sudo docker run -it username/imageName:tag
That’s all for the basics of docker, the next articles on docker will talk about some advance processes we can do with docker.

You deliver some insightful ideas-but I notice you could be generalizing. I would like to see you add to this, because you are an informative author and I get immense value from reading your posts.