How to Interface and Test Camera Module with Raspberry Pi 2/3/4

camera-module-raspberry-pi

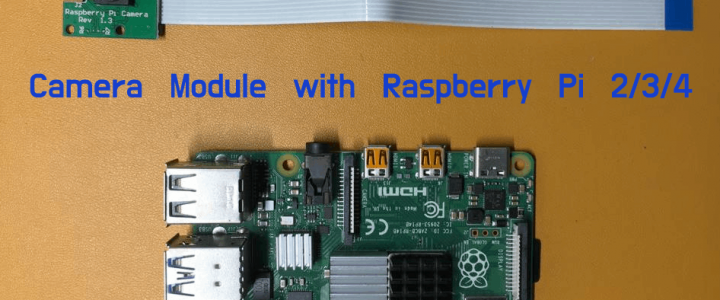
Using a Camera Module with Raspberry Pi can have a variety of use-cases ranging from highly complex AI and Computer Vision to simple use-case like setting up a CCTV system. In this step-by-step guide, we will learn how to set up a Raspberry Pi camera module and test it to take a still image to verify that our module is working as expected.

The camera module has a Camera sensor which is pretty much similar to the one we have in our smartphone. And it can be used to Take Picture and Record Videos.
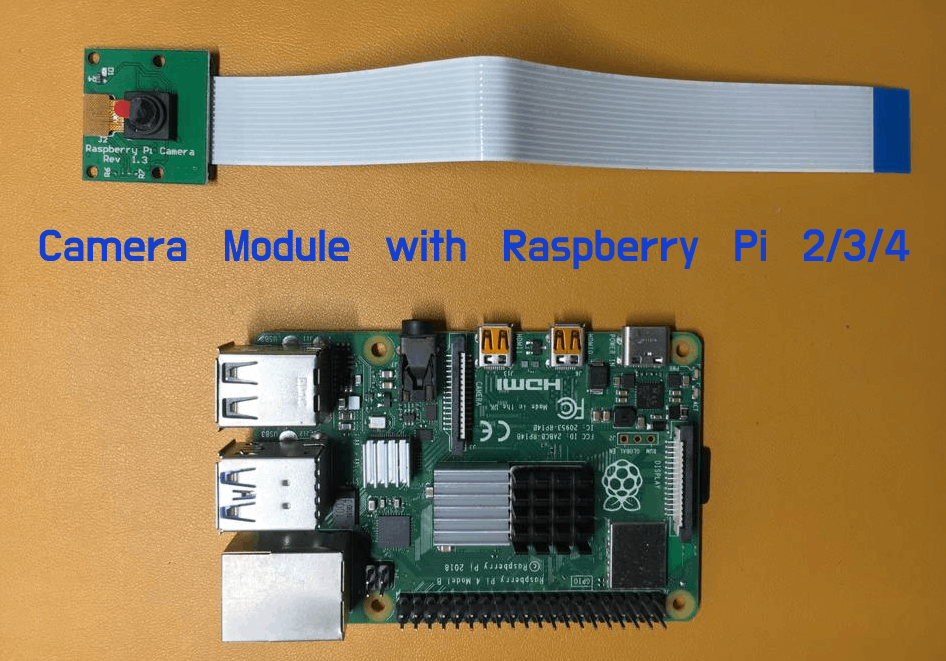
Connecting Raspberry PI camera is the first Step

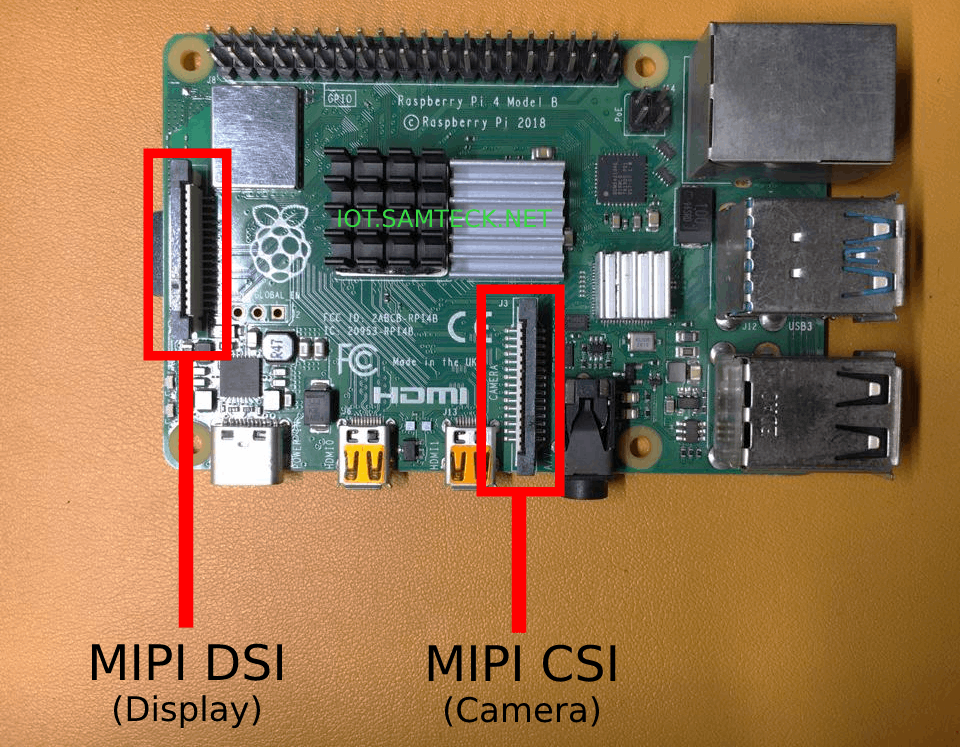
On your Raspberry Pi 2/3/4 there will be 2 MIPI (Mobile Industry Processor Interface) ports :

  • MIPI DSI (Display Serial Interface)
  • MIPI CSI (Camera Serial Interface)

Note: Make sure to switch off your Raspberry Pi if you are doing this for the first time.

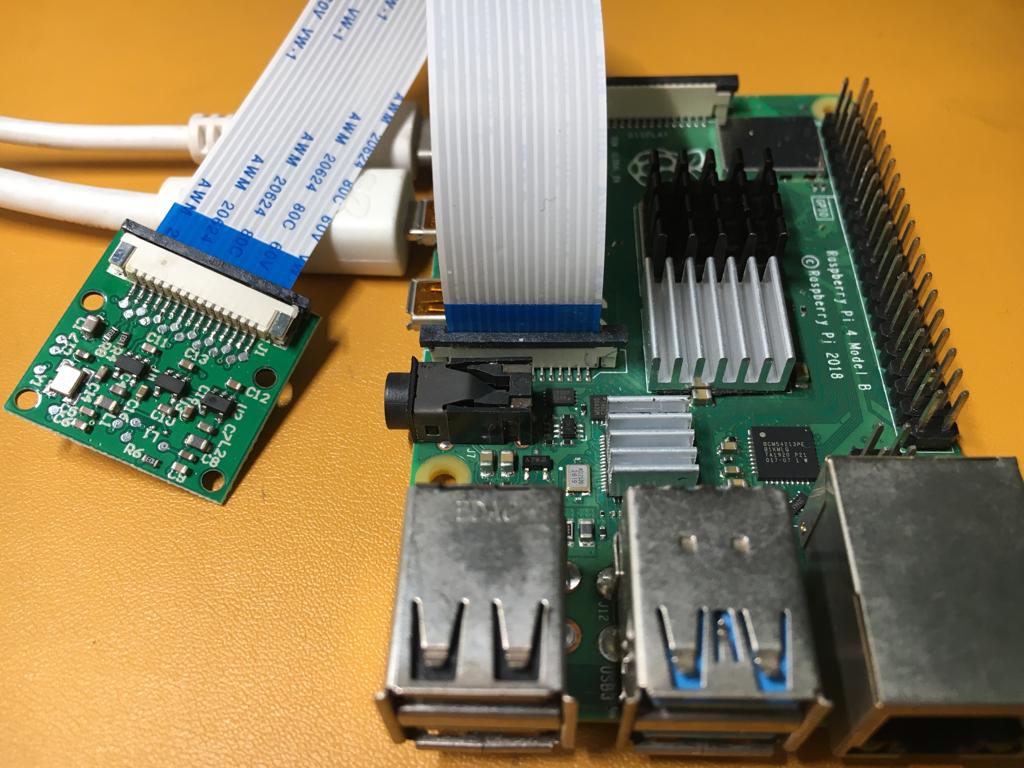
To connect the Camera Module we have to use the MIPI CSI interface (the port in the center near to the USB ports) as shown in the image.

  1. Now lift up the tab on the port a few milimeters
  2. Slide in the Camera cable (blue side of the camera connector is facing the USB ports)
  3. Push the tab back down to securly held the camera wire
Enable the Camera Interface from Raspberry Pi Configurations

To use the camera module which we attached, we first need to enable it from the Raspberry Pi Configurations.

  • Start your Raspberry Pi
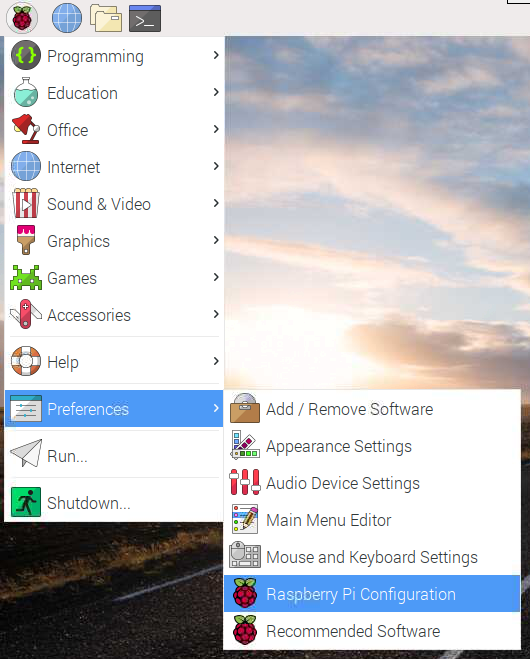
  • Open Raspberry Pi Configuration
  • Enable Camera Interface
  • Reboot your Pi

Testing your Camera Module By Taking Image and Recording Video

Now it’s time to test your camera module. We will be using raspistill and raspivid tools to take images and record videos respectively (these tools are installed by default into your Raspbian OS)

Open Terminal and run below command to take a picture and image will be saved on your Desktop

raspistill -o Desktop/image.jpg

Run below command to record a video

raspivid -o Desktop/video.h264

Below are some examples of variations of the above commands

// change resolution of the image
raspistill -o Desktop/image.jpg -w 640 -h 480

// horizontal and vertical flip
raspistill -hf -vf -o Desktop/image.jpg

// record video for 5 seconds
raspivid -o Desktop/video.h264 -t 5000

// record a video for 2 seconds with vertical flip and specified resolution
raspivid -o Desktop/video.h264 -w 1280 -h 720 -vf -t 2000

Troubleshooting

  • Restart Your Pi
  • Verify your Connection
  • Try Using different RPi or Camera module (if possible)

How to Setup ThingsBoard IOT Platform on Cloud VM [Ubuntu/Debian]

ThingsBoard-IOT-Platform

Making a Production grade IOT project is not just sending data from Device to Cloud and vice-versa, but it requires many other functionalities like

  • Proper Security Standards
  • Device Provisioning and management
  • Storing and Visualizing telemetry data
  • Rules to be implemented on the data
  • User Management with RBA (Role Based Access)

Thankfully we already have an Open-Source IOT Platform – ThingsBoard which cater’s to all the mentioned needs and is free of cost.

ThingsBoard comes in 2 different editions:

  1. ThingsBoard Community Edition
  2. ThingsBoard Professional Edition

The Community edition is Open-Source and it’s free of cost. On the other hand, the Professional edition offers additional features but comes with a cost attached. Also, both of these Editions can be Self-Managed or can be subscribed via ThingsBoard Cloud.

Here in this Article we will learn how to setup an Instance of the Open-Sourced ThingsBoard Community Edition on a cloud VM

ThingsBoard CE on Ubuntu Virtual Machine

Step 1 : Provision and Configure a VM as follows
  • 1 vCPU
  • 1GB RAM
  • 25GB Hard Disk
  • Ports Open : 8080(platform), 1883(mqtt), 5683(coap)
Step 2 : SSH into the VM and update the repo
sudo apt update
Step 3 : Install Java 11 (OpenJDK)
sudo apt install openjdk-11-jdk
sudo update-alternatives --config java
java -version
Step 4 : ThingsBoard service installation
# Download installation package
wget https://github.com/thingsboard/thingsboard/releases/download/v3.2.2/thingsboard-3.2.2.deb

# Install ThingsBoard as a service
sudo dpkg -i thingsboard-3.2.2.deb
Step 5 : Configure PostgreSQL for ThingsBoard database
# import the repository signing key and add repository contents to your system
wget --quiet -O - https://www.postgresql.org/media/keys/ACCC4CF8.asc | sudo apt-key add -
RELEASE=$(lsb_release -cs)
echo "deb http://apt.postgresql.org/pub/repos/apt/ ${RELEASE}"-pgdg main | sudo tee  /etc/apt/sources.list.d/pgdg.list

# install and start the postgresql service
sudo apt update
sudo apt -y install postgresql-12
sudo service postgresql start

Change password for the main postgres user

sudo su - postgres
psql
\password
\q

Ctrl+D to logout from postgres user

Create ThingsBoard Database

psql -U postgres -d postgres -h 127.0.0.1 -W
CREATE DATABASE thingsboard;
\q
Step 6 : Modify the ThingsBoard config file with PostgreSQL info
sudo nano /etc/thingsboard/conf/thingsboard.conf

Add the following lines to the configuration file. Don’t forget to replace “PUT_YOUR_POSTGRESQL_PASSWORD_HERE” with your real postgres user password:

# DB Configuration 
export DATABASE_ENTITIES_TYPE=sql
export DATABASE_TS_TYPE=sql
export SPRING_JPA_DATABASE_PLATFORM=org.hibernate.dialect.PostgreSQLDialect
export SPRING_DRIVER_CLASS_NAME=org.postgresql.Driver
export SPRING_DATASOURCE_URL=jdbc:postgresql://localhost:5432/thingsboard
export SPRING_DATASOURCE_USERNAME=postgres
export SPRING_DATASOURCE_PASSWORD=PUT_YOUR_POSTGRESQL_PASSWORD_HERE
export SPRING_DATASOURCE_MAXIMUM_POOL_SIZE=5
# Specify partitioning size for timestamp key-value storage. Allowed values: DAYS, MONTHS, YEARS, INDEFINITE.
export SQL_POSTGRES_TS_KV_PARTITIONING=MONTHS
Step 7 : Setup the Queue Service

By Default we use built-in and default – In-Memory queue service. For more options check this LINK

Step 8 : [OPTIONAL] make JAVA use fixed amount of RAM

Edit ThingsBoard configuration file

sudo nano /etc/thingsboard/conf/thingsboard.conf

Add the following lines to the configuration file and save it.

# Update ThingsBoard memory usage and restrict it to 256MB in /etc/thingsboard/conf/thingsboard.conf
export JAVA_OPTS="$JAVA_OPTS -Xms256M -Xmx256M"
Step 9 : Run Installation Script

The –loadDemo flag will load sample data for tenants, customers and users.

# --loadDemo option will load demo data: users, devices, assets, rules, widgets.
sudo /usr/share/thingsboard/bin/install/install.sh --loadDemo
Step 10 : Start ThingsBoard service
sudo service thingsboard start

Now you can access your ThingsBoard instance at http://[YOUR-IP-ADDRESS]:8080

The default system admin username and password will be : sysadmin@thingsboard.org / sysadmin

Bonus: Docker Installation

Another faster deployment strategy for quickly come up with ThingsBoard Instance is using Docker Container. Just execute the below commands and your instance will be up and running.

Install Docker first : Docker for Ubuntu

mkdir -p ~/.mytb-data && sudo chown -R 799:799 ~/.mytb-data
mkdir -p ~/.mytb-logs && sudo chown -R 799:799 ~/.mytb-logs
docker run -it -p 8080:9090 -p 1883:1883 -p 5683:5683/udp -v ~/.mytb-data:/data -v ~/.mytb-logs:/var/log/thingsboard --name mytb --restart always thingsboard/tb-postgres

Now we have installed the ThingsBoard platform, but there is a whole universe to be explored about how to use ThingsBoard to make your IOT application. Read the official and well put ThingsBoard documentation.

InfluxDB: Offline Backup and Restore of Databases

InfluxDB-Backup-Restore

InfluxDB is a great Database for Time-Series use cases and it has found its way into the IOT domain. This article will talk about how to migrate your data from one InfluxDB instance to another.

We will first Backup our database, make a Tarball and finally Restore the database to new instance of InfluxDB.

Check Out : How to Setup InfluxDB instance

InfluxDB-Backup-Restore

Steps to Backup and Restore Influx DB

There are 2 components of every influxDB instance :

  1. Metadata: It stores the info about all databases, its measurements and tags
  2. Data: It stores actual data for a Database

Step 1: Backup Database

We need to create a backup of our Database

influxd backup -database [DATABASE NAME] <PATH-TO-BACKUP>

# Backup Metadata
influxd backup .

# Backup Data (includes metadata)
influxd backup -database indooroutdoorenvdata .

Step 2: Move data from one computer to another

We need to zip the data and move it to our destination server.

# Zip the Data
tar -czvf file.tar.gz <PATH-TO-STORE>

# Unzip the data
tar -xzvf file.tar.gz

# To move the data between different server you can use sftp
sftp user@11.22.33.44

# Then use put/get to move the data

Step 3: Restore the Database

# Restore the database by giving the path to metadir and datadir (from config files)
sudo influxd restore -database indooroutdoorenvdata -metadir /var/lib/influxdb/meta -datadir /var/lib/influxdb/data .

# Need to change permission for imported files
sudo chown -R influxdb:influxdb /var/lib/influxdb

Step 4: Restart the Database

sudo systemctl stop influxdb
sudo systemctl start influxdb
sudo systemctl status influxdb

After this your Databases will be visible in InfluxDB console. If you had more than 1 DB, then all your DBs will be shown but data will be present only for the DB which you Backup-ed.

How to Setup InfluxDB instance on Cloud VM [Ubuntu/Debian]

InfluxDB-Ubuntu

InfluxDB is a Time Series Database system which is a perfect fit for Internet Of Things Applications. It supports high read/write load and also has retention policies that describes for how long and how much data is kept by InfluxDB over a period of time.

Here in this article we will learn how to setup InfluxDB instance on a Linux Virtual Machine with necessary security.

InfluxDB on Ubuntu Virtual Machine

Step 1 : First you need to add the InfluxDB repository with the following three commands.
wget -qO- https://repos.influxdata.com/influxdb.key | sudo apt-key add -

export DISTRIB_ID=$(lsb_release -si); export DISTRIB_CODENAME=$(lsb_release -sc)


echo "deb https://repos.influxdata.com/${DISTRIB_ID,,} ${DISTRIB_CODENAME} stable" | sudo tee /etc/apt/sources.list.d/influxdb.list
Step 2 : Run the command below in the terminal to install InfluxDB.
sudo apt update
sudo apt install influxdb
Step 3 : After the installation, it is still necessary that you start InfluxDB
sudo systemctl unmask influxdb
sudo systemctl start influxdb

Here are some general commands to Create Database and Enter Measurements Values

# Setup of Influx DB
influx
CREATE DATABASE database_name
SHOW DATABASES
USE database_name

> INSERT temperature,location=indoor value=23
> INSERT temperature,location=outdoor value=19
> INSERT temperature,location=indoor value=22
> INSERT temperature,location=outdoor value=18

SELECT * FROM temperature
SELECT value FROM temperature WHERE location='indoor''

SHOW measurements
SHOW field keys
SHOW tag keys
SHOW users

DROP DATABASE database_name

Securing your InfluxDB and Modify Config File

It’s important to secure your InfluxDB Database to protect from unauthorized access. Use the Below commands to implement Username/Password Authentication.

CREATE USER samarth WITH PASSWORD '*******' WITH ALL PRIVILEGES

# Modify config file to implement authentication 
sudo nano /etc/influxdb/influxdb.conf

[HTTP]
auth-enabled = true
pprof-enabled = true
pprof-auth-enabled = true
ping-auth-enabled = true
flux-enabled = true

# Restart to implement changes
sudo systemctl restart influxdb

# Login with below command 
influx -username samarth -password *******

You will be able to login without the username and password but you won’t be able to Use any database.

Important: If you want to access InfluxDB from the cloud you need to open port 8086 in your VM settings. No need to open the port if your cloud application is using the database.

How to Setup Grafana Instance on a Cloud Virtual Machine [Ubuntu/Debian]

Grafana-setup-vm

Grafana is a great Data-Visualisation tool which is widely used in IIOT – Industrial Internet of Things Scenarios. Grafana is also in various DevOps applications.

Here, we will learn how to deploy a Grafana Instance on Cloud Virtual Machine running Linux (Ubuntu).

Grafana-setup-vm

Steps to Install Grafana on Ubuntu Virtual Machine

Before proceeding with the steps make sure you have opened port 80 of your Virtual Machine.

Step 1 : Make sure your server is upto date.

sudo apt update
sudo apt upgrade

Step 2 : Add Grafana gpg key to install signed packages and add the repository.

curl https://packages.grafana.com/gpg.key | sudo apt-key add -
sudo add-apt-repository "deb https://packages.grafana.com/oss/deb stable main"

Step 3 : Update the repository and install Grafana.

sudo apt update
sudo apt -y install grafana

Step 4 : Systemctl commands to control the service

sudo systemctl start grafana-server
sudo systemctl stop grafana-server
sudo systemctl restart grafana-server

// Enable it to startup on boot.
sudo systemctl enable grafana-server

// check status of Service
sudo systemctl status grafana-server

After starting the server, default username and password is admin , change your password after first login.

Grafana listen on Port 80

By default, Grafana runs on port 3000, but if you want to run the server on Port 80 it is quite simple.

Just add below IPTables rule to redirect traffic on port 80 to 3000

sudo iptables -t nat -A PREROUTING -p tcp --dport 80 -j REDIRECT --to-port 3000
sudo iptables-save

This is the most efficient way to redirect your traffic, another way is to put a webserver like Nginx or Apache in front of Grafana and have them proxy requests to Grafana.

How to Setup an MQTT Broker on Cloud VM [Ubuntu/Linux] with Security

MQTT-VM-PASSWORD

MQTT protocol has been widely used in Internet of Things projects to connect End-Nodes to the Cloud. Here in this article, we will learn how to set up our personal MQTT broker on a Cloud Virtual Machine and protect it with Username-Password Authentication. This guide will be pretty basic and easy to follow along.

Install Mosquitto MQTT Broker

SSH to your cloud virtual machine and execute below 2 commands on terminal

sudo apt-get update
sudo apt-get install mosquitto

Just after installation the MQTT broker will start automatically and we can verify it with below commands (mosquitto-clients must be installed on client)

netstat -atn
mosquitto_pub -h 11.22.33.44 -t "topic-1" -m "howdy world" -d
mosquitto_sub -h 11.22.33.44 -t "#" -v

To Start/Stop/Restart use below commands

sudo systemctl start mosquitto
sudo systemctl stop mosquitto
sudo systemctl restart mosquitto

Configure Username and Password for MQTT Broker

The above setup will expose out MQTT broker to Public internet and trust me there are many hackers on the internet who have written programs to scan random IP for any open service. So in order to protect our broker we need to secure it.

Mosquitto comes with a password file generating utility called mosquitto_passwd.

sudo mosquitto_passwd -c /etc/mosquitto/passwd samarth
Password: password

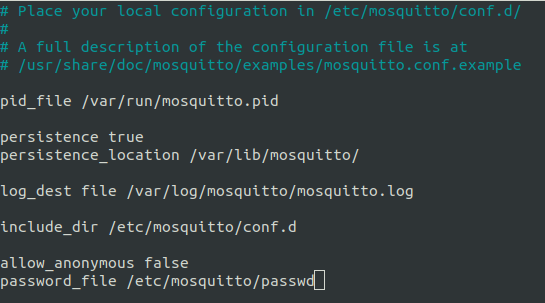
After this we need to modify the mosquitto broker file and add the below lines and restart the broker.

sudo nano /etc/mosquitto/mosquitto.conf

// add below to lines and save
allow_anonymous false
password_file /etc/mosquitto/passwd
mosquitto-config-file

Now to connect to your broker and verify Pub/Sub use the below strings

mosquitto_pub -h 152.67.7.97 -u samarth -P "password" -t "topic-1" -m "howdy world" -d
mosquitto_sub -h 152.67.7.97 -u samarth -P "password" -t "#" -v

Now our MQTT broker is secured and only our trusted clients can connect to it.

How to Setup Password Protected Node-RED Instance on Cloud VM [Ubuntu/Debian]

Node-RED is a great visual programming tool particularly for Internet of Things projects as it allows us to connect Edge Devices to the Cloud Servers/Gateways using various protocols like MQTT, HTPP, COAP. We can also interface it with various Databases like MySQL, InfluxDB, MongoDB, etc.

Moreover, it also provides a Dashboard for Data Visualisation, so it provides a complete platform to prototype your project and in many cases use it in the production environment.

Node-RED can be installed on any Linux machine be it Raspberry Pi, your local PC or a Cloud Virtual Machine. Here in this article we will learn how to quickly deploy a Node-RED instance on Cloud Virtual Machine. This method can be followed for any Cloud vendor

The VM should hava a minimum configuration of

  • 1 vCPU
  • 1 GB RAM
  • 10 GB Hard Disk
  • Port 1880 Opened to public internet

Steps to Install Node-RED instance on Cloud VM

First, SSH onto the VM (basically we want access to the shell of the Virtual Machine). Then execute the below commands to set up repos and install the components:

curl -sL https://deb.nodesource.com/setup_12.x | sudo -E bash -
sudo apt-get install -y nodejs build-essential
sudo npm install -g --unsafe-perm node-red

These commands will install Node.JS (version 12.x), install build-essentials (which contains a list of packages which are considered essential for building packages) and finally install node-red.

In addition to Node.JS, the relative Packet Manager “npm”, essential for the installation of each of its modules, will be installed. To verify that your installation was successful using the above commands, check the version of the software installed by typing:

node -v
npm -v
node-red -v

Now we want our Node-RED app to start on reboot and restart whenever some issue occurs, for that we will be using PM2 which is a production process manager for Node.js applications, It allows you to keep applications alive forever, to reload them without downtime, and to facilitate common system admin tasks.

sudo npm install -g --unsafe-perm pm2
pm2 start `which node-red` -- -v
pm2 save
pm2 startup

pm2 stop node-red

Steps to Secure your Node-RED with Password Authentication

By default, Node-RED doesn’t have any authentication, which means anyone with the IP address of your VM can access your server (and that’s not a good thing). So we need to have a basic username-password authentication for your node-red instance.

First of all generate a hash of your password and save it somewhere (to be used later)

node-red admin hash-pw

Now open the below file to be edited

sudo nano .node-red/settings.js

And uncomment the below lines and change the username and password (which we copied earlier)

    // Securing Node-RED
    // -----------------
    // To password protect the Node-RED editor and admin API, the following
    // property can be used. See http://nodered.org/docs/security.html for details.
    adminAuth: {
        type: "credentials",
        users: [{
            username: "samarth",
            password: "$2a$08$zZWtXTja0fB1pzD4sHCMyOCMYz2Z6dNbM6tl8sJogENOMcxWV9DN.",
            permissions: "*"
        }]
    },

If you are also using Node-RED Dashboard and want to implement username-password authentication there as well, uncomment the below lines and edit it.

    // To password protect the node-defined HTTP endpoints (httpNodeRoot), or
    // the static content (httpStatic), the following properties can be used.
    // The pass field is a bcrypt hash of the password.
    // See http://nodered.org/docs/security.html#generating-the-password-hash
    httpNodeAuth: {user:"samarth",pass:"$2a$08$zZWtXTja0fB1pzD4sHCMyOCMYz2Z6dNbM6tl8sJogENOMcxWV9DN."},
    //httpStaticAuth: {user:"user",pass:"$2a$08$zZWtXTja0fB1pzD4sHCMyOCMYz2Z6dNbM6tl8sJogENOMcxWV9DN."},

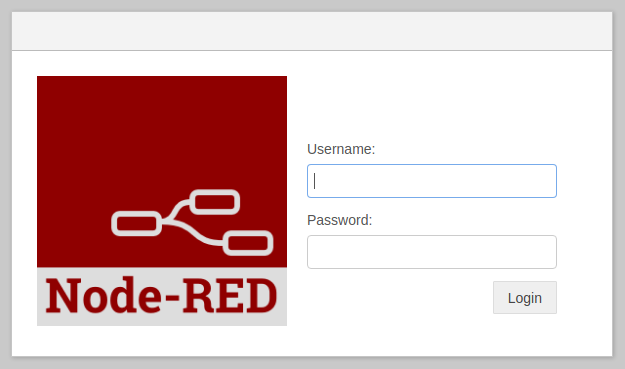
Now just restart the Node-RED and you will be prompted to enter a password to access your Application as shown in image below.

That’s all now anyone who wants to access your Node-RED application on the public internet needs to the Username and Password for logging-in.

How to Download All Ubuntu Version’s Wallpapers via Terminal

How to Download All Ubuntu Version’s Wallpapers via Terminal

At the time of writing this article, I was using Ubuntu 20.04 Focal Fossa which had nearly 20 new wallpapers. But if you have been using Ubuntu for quite some time you must be missing the old Ubuntu wallpapers which you were used to quite used to gaze.

Though it’s easier to just find the old Ubuntu Wallpapers on the internet, Download the image, and set them as your wallpaper, where is FUN in that. As a regular Ubuntu user, it is enthralling to use the command line to do our work. Let’s give some space for nostalgia to kick in.

So to download the Wallpaper of all Ubuntu versions execute the below command via terminal (shortcut : Ctrl+Alt+T).

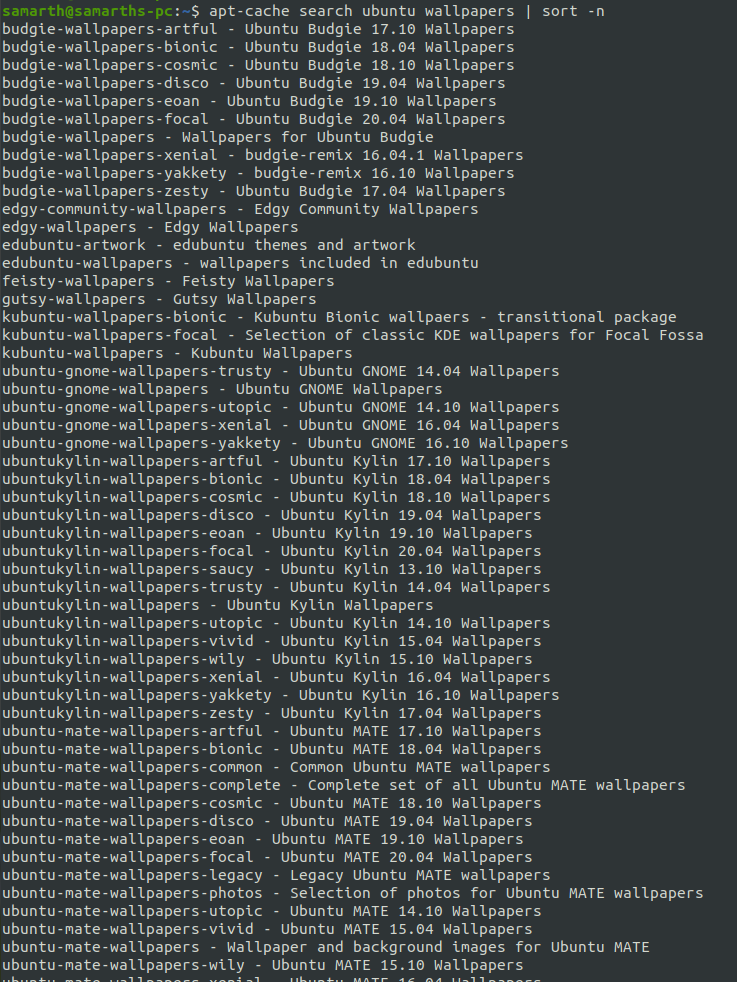
View Wallpaper Packages of all the Ubuntu Versions in sorted manner –

apt-cache search ubuntu wallpapers | sort -n

After this you can either choose a particular version to download or download almost all the wallpapers with the below command.

sudo apt-get install ubuntu-wallpapers-* edgy-wallpapers feisty-wallpapers gutsy-wallpapers

To download only particular wallpaper package use command.

sudo apt-get install [Wallpaper Package Name]

These wallapers will be download to the default Ubuntu wallaper directory : /usr/share/backgrounds

Once installed just open the default Ubuntu all to change the wallpaper, and all the wallpapers ever shipped with Ubuntu will be shown there. Enjoy!!!!

Configure Wifi on Raspberry Pi running Raspbian in Headless Mode via Terminal

rpi-wifi-config-raspbian

Well if you came to this article 1 thing is sure that you are running your Raspberry Pi in Headless Mode (with GUI) and you want to configure WiFi on your Pi. If by any chance you are using Ubuntu head on HERE. And if you are using Raspbian / Raspberry Pi OS (as they call it nowadays) you can read this article.

There are actually 2 ways to configure WiFi – “The Easy Way” and “The Technical Way”. If you are in hurry, then just follow the easy way at the end of this article and if you want to understand the internal working of an OS then you proceed with the Technical way.

configure-wifi-raspberry-pi-headless-terminal

The Techincal Way to Configure WiFi on Raspberry Pi OS

1. Editing wpa_supplicant.conf file:
sudo nano /etc/wpa_supplicant/wpa_supplicant.conf

2. Add WiFi access information to wpa_supplicant.conf file:
ctrl_interface=DIR=/var/run/wpa_supplicant GROUP=netdev
update_config=1
country=IN

# add wifi setup information here ...
network={
        ssid="SamTeck"
        psk="iot.samteck.net"
        key_mgmt=WPA-PSK
}

3. Restart Wifi Adaptor
sudo ifdown wlan0
sudo ifup wlan0

Confirmation Test:

sudo reboot
 
### wait, then without the wired ethernet connected ... 
ssh pi@wifi-ip-address

The Easy Way to Configure WiFi on Raspberry Pi OS

Well this one is pretty easy will require just 2 mins to connect to WiFi; yes I know 2 min is still lot compared to the GUI way of just selecting the SSID and entering the password; but doing it the command line way is lot more FUN!

Enter this command in your terminal and follow the steps.

sudo raspi-config

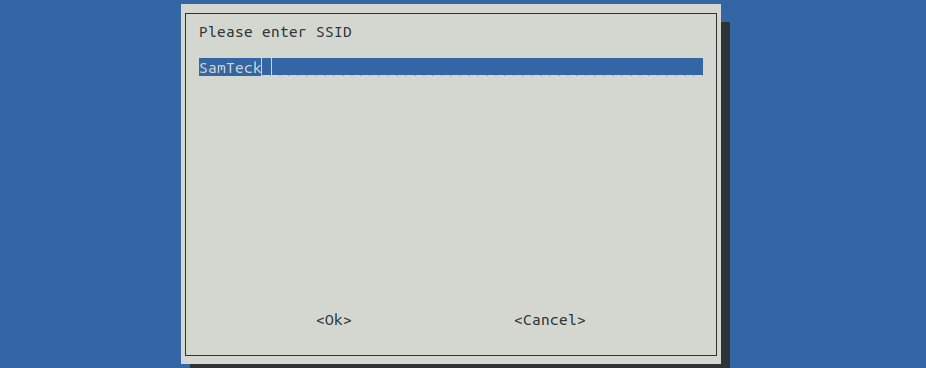
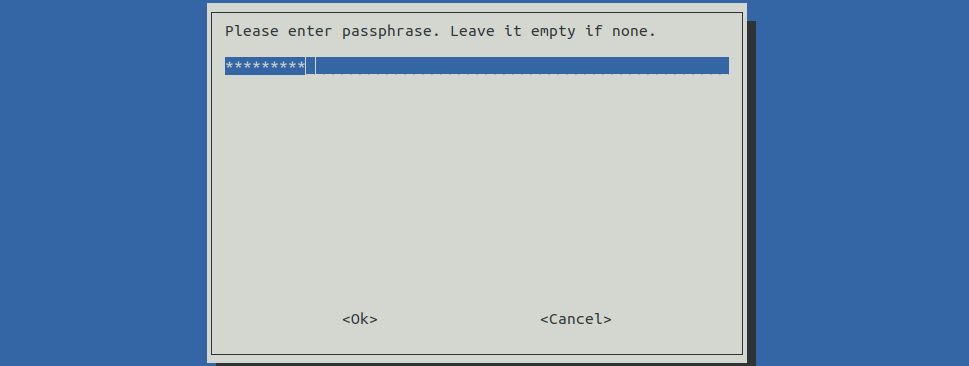
Now refer the screenshots below to enter your SSID and Password

Click OK and it will ask you to restart the Pi. After restart your Pi will be connected to the Wifi.

Configure WiFi on Raspberry Pi running Ubuntu in Headless Mode via Terminal

Configure WiFi on Raspberry Pi running Ubuntu in Headless Mode via Terminal

So, you flashed Ubuntu onto your SD card and booted Raspberry Pi for the first time, But realized that it’s not connected to the internet. Or maybe you just want to move from a wired Ethernet connection to WiFi. Well in this article we will discuss how to connect to WiFi using Ubuntu’s Netplan utility which is easy comparative to the wpa_supplicant utility which we used earlier..

Configure Wifi on Ubuntu Terminal Raspberry Pi

Follow the steps below to Configure Wifi on Ubuntu

1. Update system (Optional):
sudo apt update
sudo apt full-upgrade
sudo reboot

2. Determine interface names (copy wireless interface)
ip link show

# 1: lo: <LOOPBACK,UP,LOWER_UP> …
# 2: eth0: <BROADCAST,MULTICAST,UP,LOWER_UP> … state UP …
# 3: wlan0: <BROADCAST,MULTICAST> … state DOWN 

3. Determine your-cloud-init.yaml and open for editing (prefix 50 most of the times)
cd /etc/netplan/
ls -l
# -rw-r--r-- 1 root root 666 May 15 22:00 50-cloud-init.yaml
### note your *-cloud-init.yaml file name

### backup *-cloud-init.yaml file
cp 50-cloud-init.yaml 50-cloud-init.yaml.bak

### edit *-cloud-init.yaml
sudo nano 50-cloud-init.yaml

4. Add WiFi access information to *-cloud-init.yaml file
# This file is generated from information provided by
# the datasource.  Changes to it will not persist across an instance.
# To disable cloud-init's network configuration capabilities, write a file
# /etc/cloud/cloud.cfg.d/99-disable-network-config.cfg with the following:
# network: {config: disabled}
network:
    version: 2
    ethernets:
        eth0:
            optional: true
            dhcp4: true
    # add wifi setup information here ...
    wifis:
        wlan0:
            optional: true
            access-points:
                "SamTeck":
                    password: "iot.samteck.net"
            dhcp4: true

Test, generate and apply the changed your-cloud-init.yaml config:

  • Testing: sudo netplan --debug try (continue even if there are errors)
  • Generate: sudo netplan --debug generate (provides more details in case of issues with the previous command)
  • Apply: sudo netplan --debug apply (if no issues during the previous commands)

Confirmation Test:

sudo reboot

### wait, then without the wired ethernet connected ... 
ssh ubuntu@wifi-ip-address

This is way easier compared to the old wpa_supplicant method in which we need to install it separately and much more steps for configuration.