Configure Wifi in Debain Linux(Ubunut Server) with WPA Supplicant

wifi-wpa-supplicant

Configuring wifi is a pretty easy task when we have a Desktop Environment installed on our Linux system. But it becomes a troublesome process when we have to configure Wifi in headless mode. Here are some tools and commands to configure your wifi efficiently in any Debian Linux OS.

wifi-wpa-supplicant

We need to have a LAN connectivity via ethernet on the host computer where we need to configure Wifi.

  1. STEP 1: find the name of your Wireless Interface
    • iwconfig
    • sudo ifconfig wlan0 up   (bring wifi up)
    • sudo iwlist wlan0 scan | grep ESSID
  2. STEP 2: Connect to Wi-Fi Network With WPA_Supplicant
    • sudo apt install wpasupplicant
    • wpa_passphrase your-ESSID your-wifi-passphrase | sudo tee /etc/wpa_supplicant.conf
    • sudo wpa_supplicant -B -c /etc/wpa_supplicant.conf -i wlan0
    • sudo dhclient wlan0   (obtain IP address)
    • sudo dhclient wlan0 -r   (release IP address)

For more info like starting this service at boot time and obtain a status IP address head on to this Awesome Article

Make SSH connection on Public Internet (WAN) without Port Forwarding

remote-ssh-raspberry-pi

Making an SSH connection is something elementary while developing an IOT project, just open the port 22 install an SSH server and you are ready to go. But sometimes you need to access a device which is behind a router on Public internet. One scenario is you want to access a device that is present in a different city or a country.

remote-ssh-raspberry-pi

For this situation, we will use a VPN managed service from remote.it (this service creates a VPN between itself and your device, and let you access that device from its dynamic address)

STEP 1: Create a free developer account and install the remote.it service on your device by clicking add device option.

For raspberry pi just execute the below line

sudo apt update && sudo apt install -y connectd && sudo connectd_installer

STEP 2: Sign-in to the service using your credentials for remote.it on your terminal.

STEP 3: Select the Application (Port you want to open). Also, you can map any device in your LAN(ex. router homepage) to any application.

STEP 4: On the Web Console, click on DEVICE -> Device Name -> Service. Then from the window copy, the remote address and you are good to go.

Additional Official Documentation: HERE

How to use Arduino as USB to TTL/Serial converter

ESP8266-to-Arduino-TTL

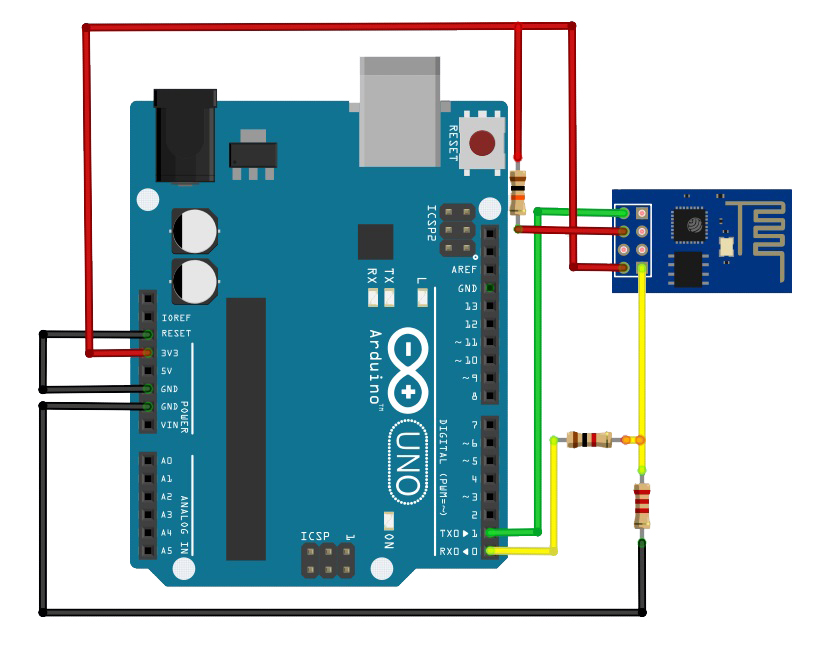
USB is the universally accepted port these days, and if you are into Microprocessor Programming you must be dealing with Serial communication to communicate with your device. There are always USB-TTL adapters available for Serial communication but sometimes we are in a dire need of these adapters but can’t find it. Or for some other reason, we need a USB to serial converter. Here we will learn how to use Arduino as a USB Serial converter. I always use this method to communicate with an ESP8266 module.

ESP8266-to-Arduino-TTL

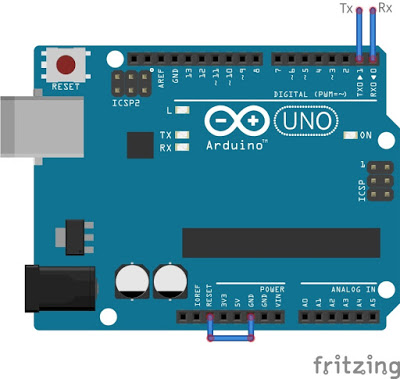
The Arduino act as a USB serial bridge between the computer’s USB port and the MCU’s serial port. The Arduino UNO has its own FTDI chip whose function is to convert TTL signal levels to USB. This is why you can communicate with the board serially using a USB cable and the Serial Monitor feature of the Arduino IDE. Here are 3 methods to do this let us have a look-

Method 1: Short Reset and GND of Arduino to Bypass Microcontroller

USB-to-TTL-converter-using-arduino-UNO-R3

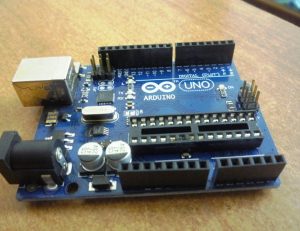
Method 2: Remove Atmel chip (Risky)

Arduino without MCU

Method 3: Code your Arduino

void setup(){
  pinMode(0,INPUT);
  pinMode(1,INPUT);
}
void loop()
{

Use any of this method to use Arduino as a USB-TTL adapter. I always use the first method as you don’t have to take risk of pin breaking while removing the MCU or flashing additional firmware to use it.

Systematising : LINUX, UNIX, Debian, Ubuntu, Kernel, GNOME, GNU, APT, RPM, YUM, GNOME

Systematising : LINUX, UNIX, Debian, Ubuntu, Kernel, GNOME, GNU, APT, RPM, YUM, GNOME

linux-kernel-gnu-gnome
To understand the co-relation between all these terms we need to go back a little bit in time, say the 1960’s. In early 1960, the AT&T Bell Laboratories, MIT and General Electric started developing a time-sharing operating system called MULTICS (Multiplexed Information and Computing Service). The project went on till 1967 when things didn’t work out and the project was dropped.

But, Interestingly two of the scientists named Ken Thompson and Dennis Ritchie (creator of C language) continued their work. They worked on UNICS (Uniplexed Information and computing system) which was made on a machine named PDP-7. Later this was renamed UNIX (but license fees were not affordable by everyone especially students)

Then from where did, LINUX came into the picture?

So there was a guy named Linus Torvalds who was pursuing his masters in a Finnish university. He wanted to buy a license for UNIX but luckily he didn’t have enough money (which turned out good for us). So he decided to make a clone of UNIX from scratch called LINUX [“Linux: A Portable Operating System” was the title of his thesis in M.Sc.]. JFYI he also created GIT to manage the files while he was creating Linux.

Now its time to get Technical!!!!!!!

Let’s again start from the beginning.

  • A Computer OS is a piece of software that acts as the base of a computer. It does critical tasks like assign memory and start applications.
  • An OS runs on top of an even lower level program called a Kernel. A Kernel is written in machine-level languages, and interacts directly with the hardware and gives driver support.

Now that you know the base, let’s start with the answer. Unix and Linux are both popular Kernels. Both have their own advantages and fans.

Unfortunately, a kernel cannot act as an OS on its own. It misses essential features, such as – putting an image to a screen, copying data to the hard drive and basic software like a text editor. That is where GNU comes in. When Linus Torvalds wrote an awesome piece of open-source software called Linux, Richard Stallman wrote a suite to run on it called GNU. The combination of GNU and Linux has become ubiquitous to the point that the duo is often referred to as just Linux

When it comes to Linux, GNU/Linux isn’t enough to run a modern PC on its own. So it gives programmers the ability to go ahead and write their own versions of GNU/Linux. These different versions, called Distros or Distributions, differ in their base software. So two Distros can have different package managers, text editors, terminal applications, calculator apps, etc.

Full list of all Linux Distros (don’t forget to zoom the flowchart on right)

Most commonly used Linux Distros

Each Linux Distribution is typically tailored for specific target systems, such as servers, desktops, mobile devices, embedded devices, etc.

There are mainly 3 popular parent Linux distros

  1. DEBIAN
  2. RED-HAT
  3. Slackware

(1 more mention being android)

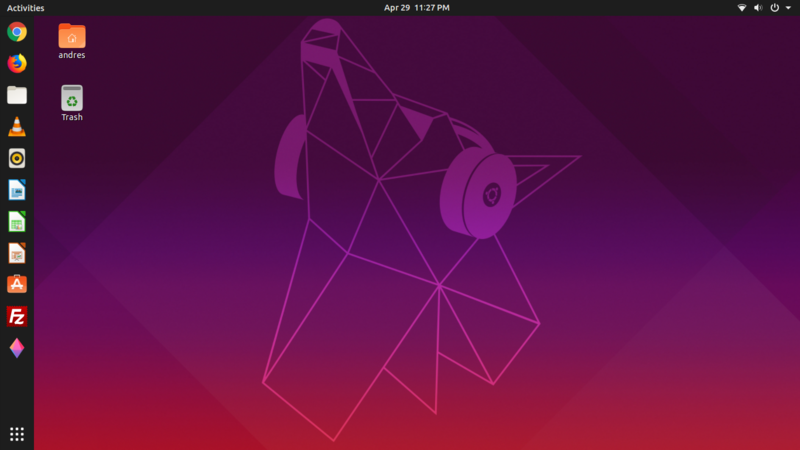
ubuntu-debian-2019
Ubuntu Distro Based on Debian

All the software present in a Linux distro is managed by a Package Management System. This manager keeps a log of all the programs installed on your system, keeps a listing of all programs NOT installed on your system, and easily identifies upgradable programs. A Linux user MUST be familiar with the package manager in order to install the software.

Below is the list of package management systems of popular Linux distros

DEBIAN
Package Format: deb
Package Management Software: apt (advance packaging tool)

REDHAT
Package Format: rpm
Package Management Software: yum (yellowdog updater modified)

Slackware
Package Format: tgz
Package Management Software: slapt (slack advance packaging tool)

ANDROID
Package Format: apk
Package Management software: PackageInstaller

Some famous Flavours of Linux Distros

  • Debian: Ubuntu, Raspbian, Knoppix, Mint, Kali, Lubuntu
  • RedHat: Fedora, CentOS, Redhat Enterprise, Amazon Linux image
  • Slackware: SUSE, vectorLinux
  • Android: Android, CyanogenOS, Android Things, Project Brillo
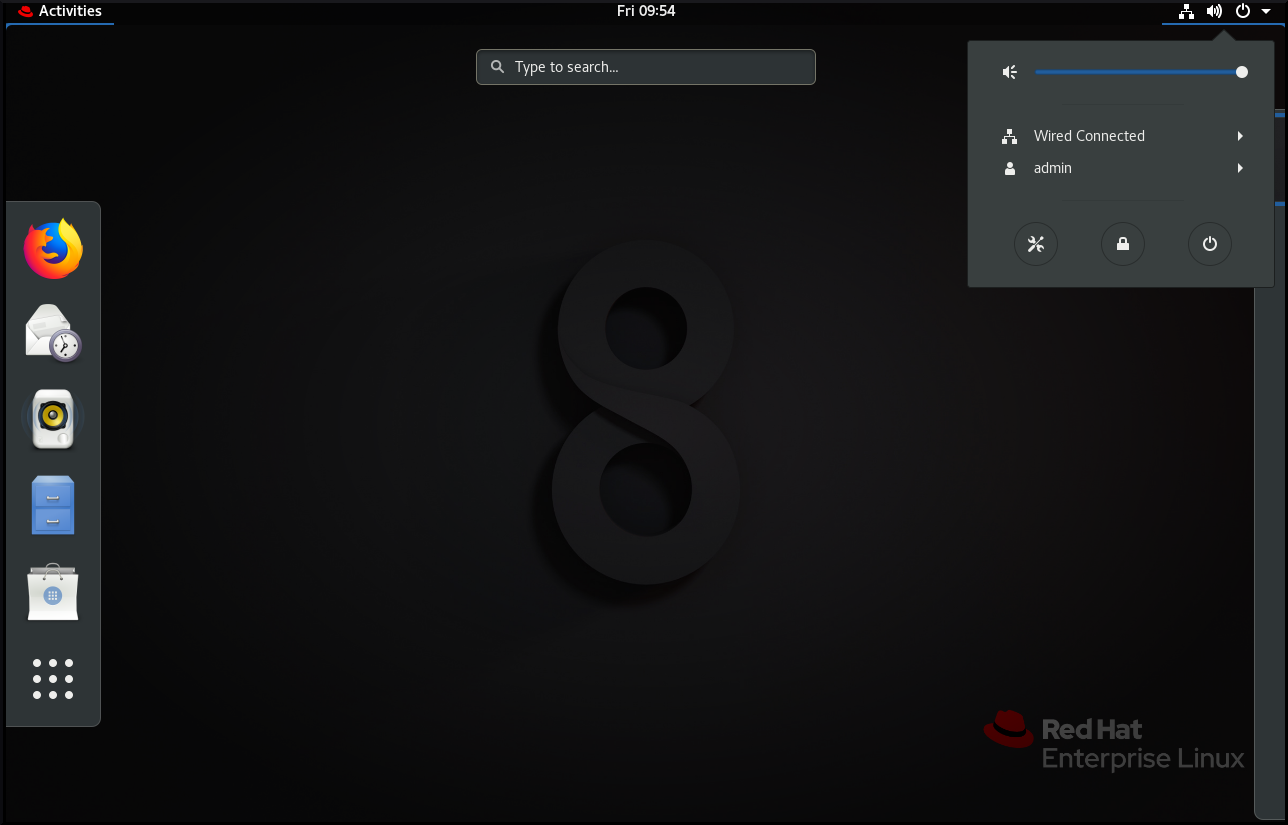
red-hat-enterprise-linux-gnome
Red-Hat Enterprise Linux (GNOME)

Getting Familiar with Desktop Environments

Now, on top of a Linux Distro, run certain programs called Desktop Environment. These DEs are used to change the look and feel of the distro. Most DEs can run on the majority of Distros, so you have your own choice when customising your desktop. Popular DEs include

  • GNOME
  • KDE
  • UNITY
  • MATE
  • LXDE
  • Xfce
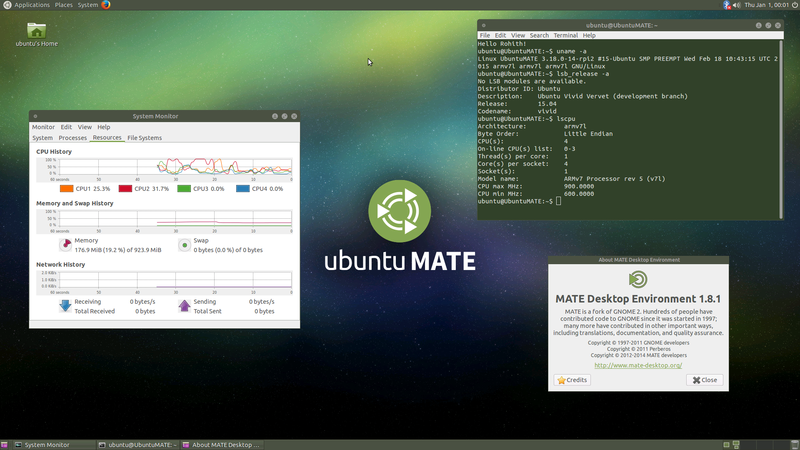
Ubuntu with Mate Desktop Environment

Wrapping up all and bonus point

– Kernel interacts with hardware
– Linux distro adds software(using a package manager) on top of the kernel
– Linux flavors add more features as per their unique use case
– Desktop Environment gives GUI interface

Bonus: where does MAC OS stand in here?

……..+—–(modify)—— UNIX——-(clone)—–+
………|                                                                     |
      BSD                                                              GNU
………|                                                                     |
Darwin/OS X                                                     Linux

Python – What is a Program ?

Before beginning with learning Python programming we need to understand what is a Program (more specifically Computer Program).

A Program is a sequence of instructions that specifies how to perform a computation. Computation can be anything like – taking input from user and perform mathematical operations, solving for roots of an equation or playing a audio/video file.

For different programming languages, the specifics to do these tasks can be different. But few basic instructions(below) appear in just about every language.

INPUT : take input in the program (can be user input from keyboard, a file, some data from network or other device)

MATH : performing basic mathematics operations (addition/subtraction)

CONDITIONAL EXECUTION : check for certain conditions and taking appropriate action

REPETITION : perform some action repetitively (that’s what computers are known for…)

OUTPUT : displaying the final output of program on screen, saving in a file or sending over a network/ other device

That’s the basic outline of every program you will ever gonna write.

So in a nutshell PROGRAMMING is the process of breaking a large and complex task into smaller and smaller sub-tasks until sub-tasks are simple enough to be solved with the basic instructions given above.


What is NTP/SNTP Protocols, How NTP works

What is NTP/SNTP Protocols, How NTP works

The Network Time Protocol is a Networking Protocol which is used to synchronize time for nodes in a Network. NTP is one of the oldest protocol in the TCP/IP stack which is still in use. NTP is intended to synchronize all participating computers to within a few milliseconds of Coordinated Universal Time (UTC).
The protocol is usually described in terms of a client-server model, but can as easily be used in peer-to-peer relationships where both peers consider the other to be a potential time source.

How NTP works

NTP works on IP port – 123 and to run NTP we first install NTP daemon (ntpd) on both Time Provider(server) and Time Consumer(client)

The NTP client initiates a time-request exchange with the NTP server. As a result of this exchange, the client is able to calculate the link delay and its local offset, and adjust its local clock to match the clock at the server’s computer. As a rule, six exchanges over a period of about five to 10 minutes are required to initially set the clock.

Once synchronized, the client updates the clock about once every 10 minutes, which prevents the time drift from happening. In Other words ,large adjustment are made quickly and small adjustment are made over a period of time.


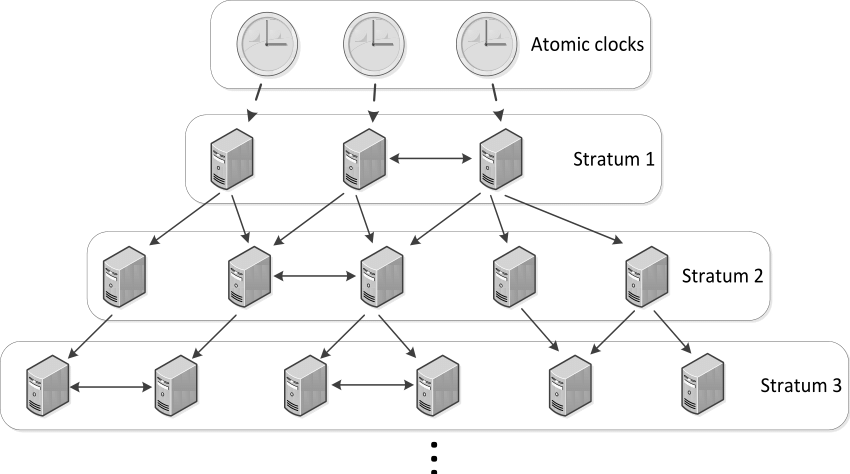
NTP Stratum

ntp-stratum

NTP uses the concept of stratum to define the hierarchy of NTP servers. At top of the hierarchy are Stratum 1 which gets their time from Atomic clocks which tells exact time at the moment.

Similarly Stratum 2 time providers get their time from Stratum 1 time provider and Stratum 3 from Stratum 2. And these stratum can go upto 256 layers.

There are many Stratum 2 servers available on the public internet which we can use for couple of PC. But if you have large number of PC’s in the network it is wise to create a local stratum (maybe 2-3) which get its time from Stratum 2 time provider and PC’s in your local network can get time from its local Stratum.


Some important terms related to NTP

Stepping: When time difference between consumer and provider is large then time adjust are made more quickly ~1min.

Slewing: When time difference is very less ~128ms the ntp will adjust time gradually around every 17 minutes

Insane Time: If time difference between consumer and provider is more than 17 min, then ntpd treats that time to be insane.

Drift: Your clock will drift due to fluctuations in the frequency oscillating the quartz crystal on your motherboard. A fluctuation of just 0.001% (0.00001, or 10 PPM) means losing or gaining about 1 second per day.

Latency: The time delay between when data is sent on a network to when it is received. Latency can make it difficult to synchronize processes over a network, especially when the latency is variable. The latency is added to the time it got from server to get the exact time.

Jitter: It is a measurement of the variance in latency on the network. If the latency on the network is constant, there is no jitter.


Configuring NTP

Here we will see how to configure a system to use NTP

#installing NTP on linux machine
yum install ntp
apt-get install ntp

Now we will edit the server for NTP. Open the file /etc/ntp.conf

And edit the server info as [server server_address]

you can get list of server from https://www.pool.ntp.org/en/. From the website choose the server closest to your geographical location.

Remembered, previously we talked about Insane Time (where system and server time difference is more than 17min), to prevent such situation we run below command to update the system time (close to actual time) to eliminate insane time issue

ntpdate server_address

#you can use google public ntp server 
#sometimes you need to run it more than once
ntpdate time.google.com

Note : Before running the above command make sure to turn of ntpd by [ntpd off] and start after executing above command [ntpd on].

Monitor time synchronization : ntpq -p , ntptrace
Log File of NTP :  /var/log/ntp.log


How is SNTP different from NTP ?

Simple Network Time Protocol (SNTP) is a simplified, client-only version of NTP. SNTP can receive only
the time from NTP servers; it cannot be used to provide time services to other systems.

SNTP typically provides time within 100 milliseconds of the accurate time, but it does not provide the complex
filtering and statistical mechanisms of NTP. In addition, SNTP does not authenticate traffic, although you
can configure extended access lists to provide some protection. An SNTP client is more vulnerable to servers
that have unexpected behavior than an NTP client, and should be used only in situations where strong
authentication is not required.

So that all to get the basics of NTP protocol if you are more interested to dig in, do visit Cisco NTP

What is GIT and GitHub | The Ultimate Difference

git-vs-github

Many people who have just started to work in a collaborative environment encounter with the term Git and most of the time they are not able to differentiate between Git and GitHub. Here in this post we learn about Git and GitHub and see how are they related to each other. Also, Git was created by Linus Torvalds (the mastermind behind Linux) and is written in C#.

git-vs-github

First, we will understand what is GIT :

Git is a piece of software which increases our efficiency while writing the code. Git is a Version Control System: manages the changes in your code with time, other VCS tools being – Apache Subversion, CVS, Mercurial. It also provides collaboration between different members of the team.

The directory which contains your code and its dependencies is called a Repo (repository). In Git we have 2 different repos

  1. Local Repo: modified by an individual developer and resides in the local PC of developer
  2. Central Repo: acts as the main repo and resides on a server, all developers make changes to the local repo and push it to the central repo.
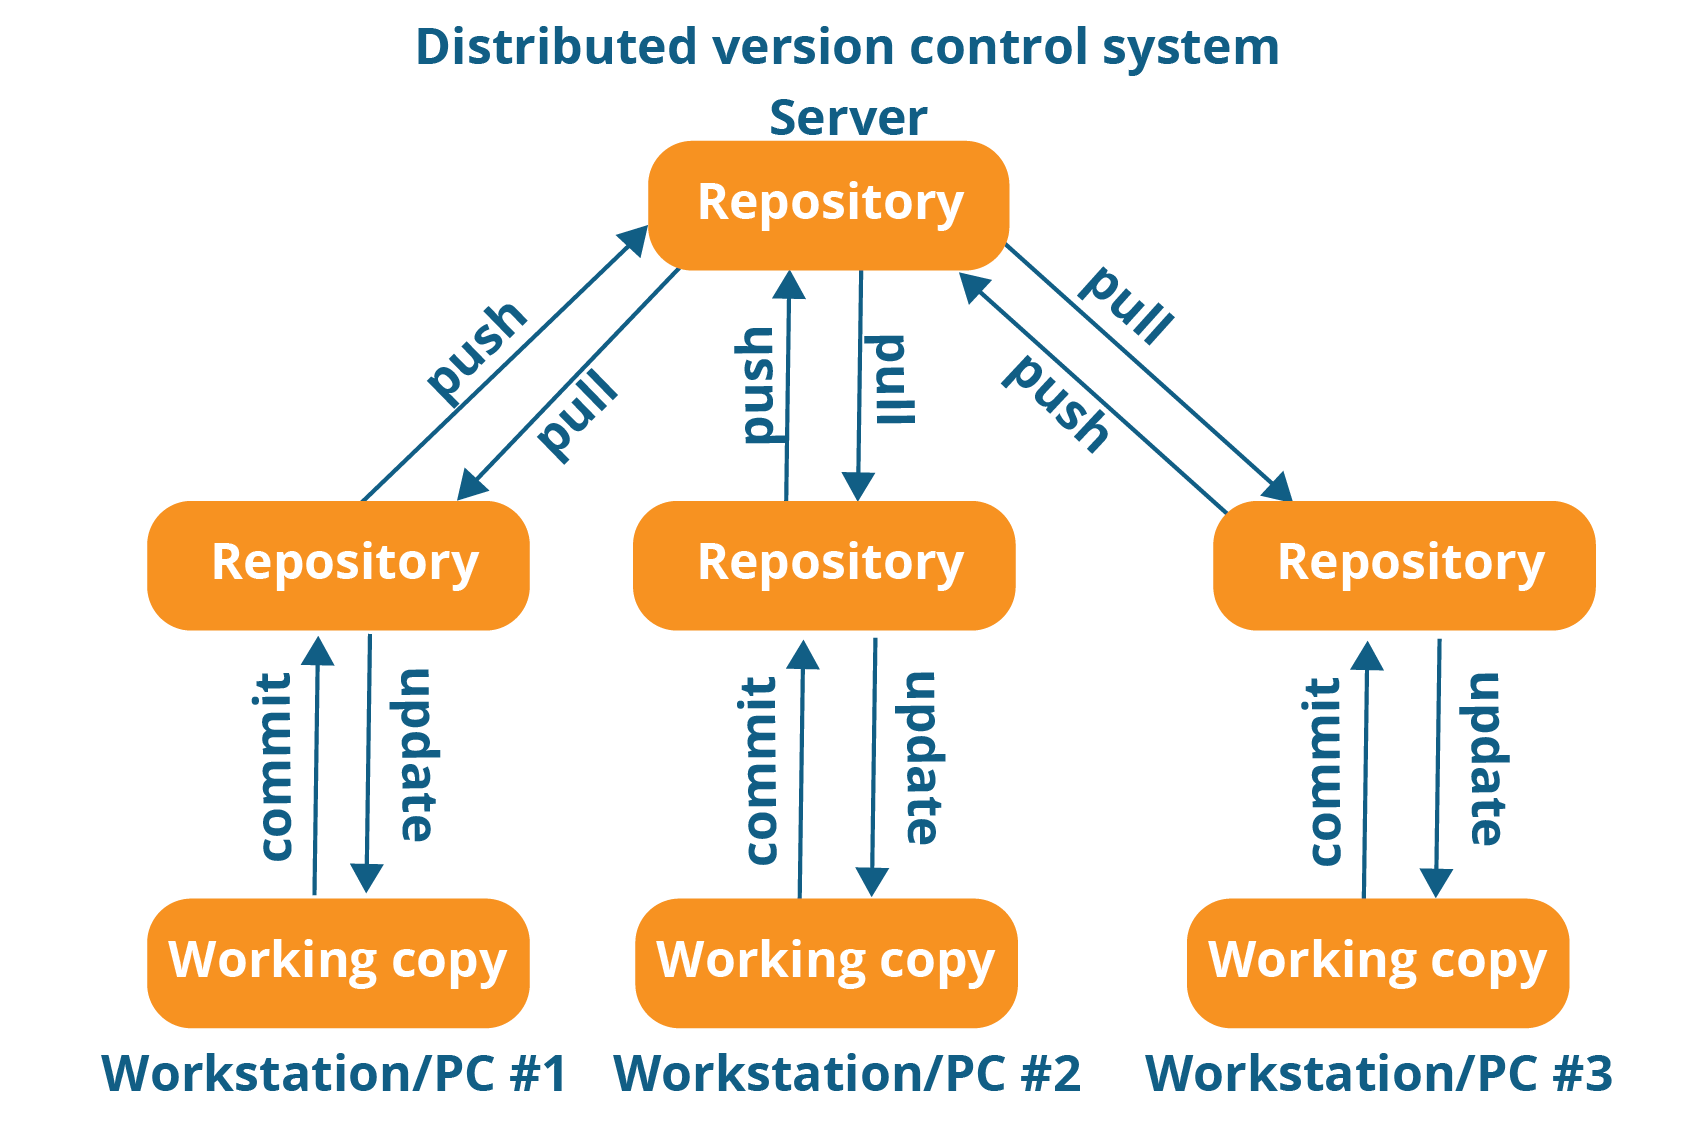
Git-work-flow
Workstations are local PC of Developers, Repository is the local repo of developers and on top we have central repo.

Some feature of Git :

  • Distributed Version Control System
  • Git uses SSH to connect to the central repo
  • In the local repo, there is a folder named [.Git] which contains info about your local repo
  • Many developers can work on a single project at a time
  • We always have a backup of code in local repos, in case the central repo fails

Click here to know about Git Commands

What is GitHub :

GitHub is nothing but a company that allows you to host your central repo on the Internet. You can even create a central repo in your local network but it can’t be accessed over the internet.

GitHub.com has created a user-friendly design and easy to manage the central repo, but at its core its just a central repo on the internet.

On GitHub, you can create a repository for every project you are working on. GitHub offers you unlimited public central repo(can be seen by anyone on the internet) and private central repo with a limitation of max 3 developers working on the project.

It’s always a good idea to create a readme file in your repo as it helps an unknown person to get a brief idea about your project. And people who have added their ssh key to the central repo server can modify the code.

So, in a nutshell, Git is a piece of software which helps to manage our code and GitHub.com is a website which allows us to use a feature of Git which is central repo.

Git – The Layman’s Guide : BASIC CONCEPTS and COMMANDS

GIT is basically a distributed repository (place to store code) where multiple contributors can work simultaneously and collaborate their work. It also serves as a Version Controls System (system that records changes to a file or set of files over time so that you can recall specific versions later).

GIT-branches

GIT allows you to revert files back to a previous state, revert the entire project back to a previous state, review changes made over time, see who last modified something that might be causing a problem, who introduced an issue and when, and more. It can also help in the situations where someone screwed up the code and it’s not working anymore. You can use the Version Control System to revert back to a safe version where everything was working perfectly normal.

GIT WORKFLOW

It is very important to understand GIT workflow. Let us learn a few key terms

Repository: This is your project (collection of source code). This is a GIT specific term and is a standalone unit for your project.

Working Directory: This is the working directory of your code. Here you edit your code and save changes.

Staging Area: When you are confident about your code and want to save it to the repository, You first bring it to the Staging area. You can bring your files in a sequential manner to the staging area.

Local Repository: When you have all the files you wanted to modify in the staging area and finally want to make changes to your repo, you save it to your local repo.

Remote Repository: Remote repo is a repository on a remote server which acts as a central repo for your project. Once you are 200% confident about your code. You move it to the remote repo.

Below diagram clearly explains how your code moves in the GIT environment.
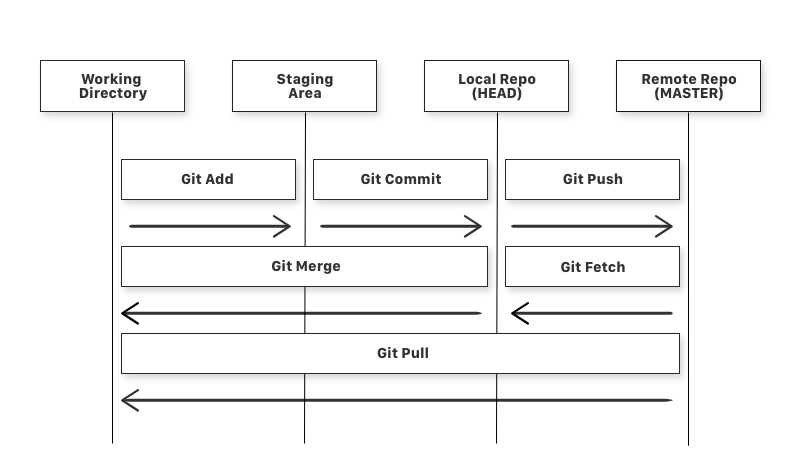
GIT-data-flow-diagram

Commands in Detail :

  • git add: add a file from working directory to staging area
  • git commit: add files from staging area to local repo
  • git push: add files from the local repo to the remote repo
  • git fetch: get files from the remote repo to the local repo (not working directory)
  • git merge: get files from the local repo to the working directory
  • git pull: get files from remote repo directly to the working directory (same as git fetch and git merge)
  • git status: gives info about all the files which are yet to be committed (to local repo)

These are the basic commands to use while working with GIT. How we will see how to use Git to work with our code.

STEP BY STEP guide to initializing and working with GIT

Check weather GIT is installed

$ git --verison


Tell GIT about your identity

$ git config --global user.name "YOUR_USERNAME" 
$ git config --global user.email "me@samteck.net"

$ git config --global --list # To check the info you just provided


Generate SSH and add to your GitHub account (more on ssh keys)

$ ssh-keygen -t rsa -b 4096 -C "me@samteck.net"

$ ssh -T git@github.com   # check your ssh connection

– Copy the public ssh key (id_rsa.pub) from /.ssh folder in your home directory to SSH settings in your GitHub account


Lets GITify our first directory
Navigate to your working directory (in terminal) and initialize the directory with

$ git init

this will create a hidden folder in the working directory where info about the repo will stored. Also, there is a file called – .gitignore (it stores the info about the files in the working directory which need to ignored in repo like OS related files)

Add files to the staging area (Index: view of your working directory that is ready for commit)

$ git add .   # add all the files in that folder

$ git add *file name*   # add specific files to staging area

Before committing the changes we can check the status of the working directory (staged and unstaged changes)

$ git status

When all the changes are staged we can commit our code which will be then stored in the local repo. It is a good practice to add a message with every commit so that other users can see what modification has been made. Also, it’s better to sync your workspace with remote repo before committing to check that no other commits were made on remote repo by any other user.

$ git commit -m "First commit"

NOTE: every commit can be identified with a commit hash (SHA-1). On Github, you can view that commit from below URL

https://github.com/<owner>/<project>/commit/<hash>

Also, you can uncommit a change by

$ git reset HEAD~1

Add Remote Origin

Now we have created a local repo, but to add it to a remote repo we need to provide the address of remote repo

$ git remote add origin remote_repository_URL   # sets the new remote

$ git remote -v   # List the remote connections you have to other repositories.

$ git push -u origin master   # pushes changes to origin

Now you have successfully created a local repo and pushed it to the remote repo. If you open your GitHub account, you can see that your repo is available remotely on GitHub.

Useful GIT Commands

$ git diff   # To show the files changes not yet staged

$ git log    # view commit history

$ git clone remote_repository_URL   #download remote repo to working directory

$ git pull origin master         # update your local repo with changes on remote repo

$ git checkout <branch/commit>   # check out desired status of repo

When you git fetch, Git gathers any commits from the target branch that do not exist in your current branch and stores them in your local repository. However, it does not merge them with your current branch. This is particularly useful if you need to keep your repository up to date, but are working on something that might break if you update your files. To integrate the commits into your master branch, you use git merge.

Basically, this will be your control flow which you will be using most of the times.

$ git add .

$ git status # Lists all new or modified files to be committed

$ git commit -m "Second commit"

$ git push -u origin master

That’s all for the basic understanding of GIT. Thanks for reading.
What are SSH Keys and How to use them

ssh_keys

Most of you guys must have logged onto servers using SSH protocol and verified yourself with a Password. Everything seems good, but don’t you sometimes feel a bit frustrated when every-time you have to enter the password, also entering the password is not the best way in terms of security (storing a password in scripts which auto logins to a server is not a good idea). That’s where the concept of SSH Keys comes into the picture.

ssh_keys

‘SSH keys’ is one of the many ways of authenticating, while logging to a remote server over the internet. SSH keys work on the principle of Asymmetric cryptography where client and server have different keys and authentication is successful as long as these 2 keys fit the formula (as both of these keys are derived from a mathematical formula). Now we will see how to use SSH keys as a method of authentication.

STEP 1: Generate an SSH key pair

ssh-keygen -t rsa

This command will generate 2 keys under a hidden folder named ‘.ssh/‘ in your home directory. Before generating new keys its best to check if any previous keys are present (cd ./ssh)

The 2 generated keys are as follows :

PUBLIC KEY (id_rsa.pub): This key is given to the system (server) to which we are trying to connect.

PRIVATE KEY (id_rsa): This key is stored on the system from which we are trying to connect.

STEP 2: Upload the Public key on Server

Now you need to upload the Public Key to the server to which your client will connect. eg: while configuring ssh keys on Github we paste the public key in Github’s ssh keys settings.

ssh-copy-id root@172.20.10.2

ssh-copy-id uses the SSH protocol to connect to the target host and upload the SSH user key. This command edits the authorized_keys file on the server. It creates the .ssh directory if it doesn’t exist. It creates the authorized keys file if it doesn’t exist. Effectively, copying the public key to the server.

STEP 3: Connecting to the Server

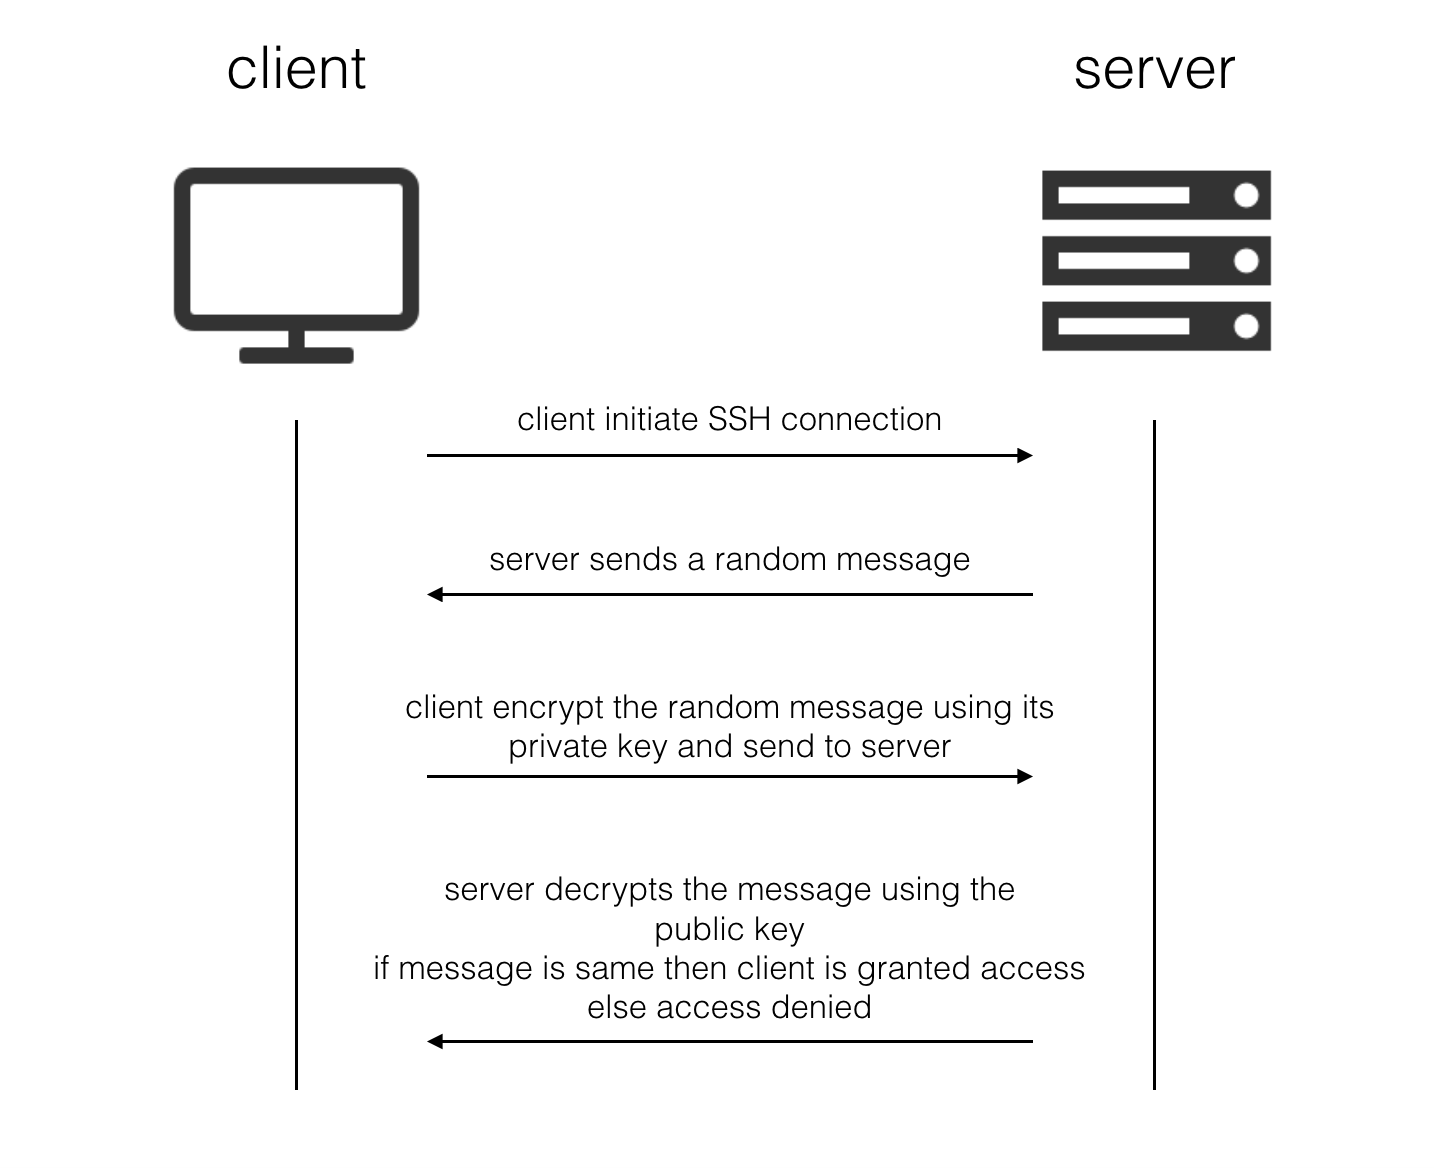
When the client tries to connect to the server, below sequence of operations take place

ssh-authentication

This creates an authentication mechanism based on “something you have” (the private key file) as opposes to “something you know” (a password or phrase). The best authentication mechanisms contain a component of both – this is why ssh-keygen prompts you for a passphrase to encrypt the private key.


NOTE: After the client is authenticated by the server an SSH tunnel is established. The data send over SSH is encrypted with a session key(which is shared between client and server after establishing the connection). Also, the session key uses a symmetrical cryptography technique.

Introduction to SSH (Secure Shell) Protocol

We have many times logged onto servers via ssh command using our terminal or if you are a windows user you must have used putty to login to any cloud servers (AWS for example).  But do we know how exactly SSH protocol works?

ssh-protocol

SSH stands for Secure Shell which is a secure way of connecting to a public server over the internet. SSH is widely used by network administrators for managing systems and applications remotely, allowing them to log into another computer over a network, execute commands and move files from one computer to another.

SSH works on Client-Server model: Client is where the session is displayed and Server is where session runs. SSH by default runs on TCP port 22.


The most basic use of using ssh is ssh username@server

ssh root@172.20.10.2

This command will cause the client to connect to the server (172.20.10.2) with the username (root) given. Afterwards, for first-time connections the user will be prompted with the remote host’s public key fingerprint and prompted to connect, despite there having been no prior connection:

The authenticity of host '172.20.10.2' cannot be established.
DSA key fingerprint is 01:23:45:67:89:ab:cd:ef:ff:fe:dc:ba:98:76:54:32:10.
Are you sure you want to continue connecting (yes/no)?

Answering “yes” to the prompt will cause the session to continue and the host key is stored in the local system’s known_hosts file. This is a hidden file, stored by default in a hidden directory, called /.ssh/known_hosts, in the user’s home directory. Once the host key has been stored in the known_hosts file, the client system can connect directly to that server again without the need for any approvals: the host key authenticates the connection. Afterwards, it will prompt you to enter the password and a secure connection will be established.

The known_hosts files can sometimes be exploited by hackers. Also adding username and password in automated scripts can put your server to risk as anyone with access to source code can view those details.

To overcome these problems we use SSH KEYS (click for more info).